Power Kite Forum

Slingshot Turbo Bar!

Jovver - 8-12-2009 at 06:26 PM

So, after all the hype about the Ozone Turbo bar, watching the only video available on Youtube over about 2 dozen times (you know, the guy with the 3m Beamer) and being the hands-on project oriented engineer (in training) that I am, I decided to take on a Turbo Bar project myself. Since I just put a 5th line on my 4 line Fuels, I can use one bar for both of them, which left me with a 20” 4 line Slingshot bar sitting around unused. I could have sold it for a decent buck, but I wanted to keep it because it was in immaculate condition. So I decided to use it for this project.

At first the thought of making my own Turbo bar was a daunting one with figuring out what lines and pulleys I needed. I recalled someone on this forum mentioning something about Ronstan pulleys at West Marine, so I decided to take a look on their site. Man that place is an engineer’s or boater's paradise; so many different pulleys, supplies, and gadgets to look at. It is almost as good as McMaster-Carr! So I found the exact Ronstan pulleys (at roughly $10 a pop) that are used on the Ozone Turbo bar. If I was going to go through with this, might as well use what is proven effective and is the standard right now. Next I determined that I would need standard leader line for the rest of the line on the bar to ensure minimal stretching and wear. Then all I had to do was place the order, and wait patiently for my parts to arrive.

Jovver - 8-12-2009 at 06:28 PM

Close up of the Ronstan Pulleys and grey leader line:

Pic removed.

Jovver - 8-12-2009 at 06:30 PM

First thing I did after inspecting my newly acquired parts was lay them out in the order that they would be assembled… I also had some vinyl tubing lying around and decided to use it to cover my brake strap.

Pic removed.

Jovver - 8-12-2009 at 06:31 PM

It was surprisingly difficult to get some of the pulleys through the sewn leader line loops, a problem that I didn’t think would have occurred because all of the leader line loops that I have seen were fairly large, but I made them work. After a few mins of assembly, it was already almost over...

Close up of the half assembled Turbo bar:

Pic removed.

Jovver - 8-12-2009 at 06:32 PM

Finally the finished product:

Pic removed.

Jovver - 8-12-2009 at 06:33 PM

One significant difference that you will notice between my Turbo bar and the production Ozone one is the adjustment. Since I used my stock depower clam cleat, I have adjustment of the middle line, whereas the Ozone has brake line trim. The way I designed this bar was that to have the pulleys the same length when the bar is all the way in, the clam cleat is trimmed most of the way in. To shorten the brakes, I will let the clam cleat trim out, which will shorten the brake leader lines. With this setup, anyone can make a Turbo bar with a spare depower bar.

I really have high hopes for this bar, and I feel I did a really good job for a first shot on it. This bar setup only cost me $68, about $28 for the 3 pulleys, and $40 for all the leader line work. I would like to give props to Jeff at Prokitesurf, he did all the leader line work for me and they turned out beautifully, and shipping was very reasonable and extremely quick.

So there is my shot at a Turbo bar, now I just have to wait for some wind and time that I can actually get out and try this bad boy out. But hold on a second, did you think I was done?

Jovver - 8-12-2009 at 06:34 PM

I couldn’t just stop at one project, if I’m buying supplies for one, why not knock another one out right away? While purchasing pulleys at West Marine, I stumbled upon some snaps and miscellaneous fasteners, and have been trying to decide whether to purchase and handle pass system for my harness for later on down in the water, or to just wait it out. Needless to say, I got some extra supplies right away, and this is the handle pass system I constructed for my Mystic Force Shield seat harness:

Pic removed.

Jovver - 8-12-2009 at 06:34 PM

The total cost of this setup was only $27.50, $20 of it being that huge stainless steel snap, and the rest leader line. Both projects cost me just $95.50. Again, I covered the line with the vinyl tubing I had already. I’m very happy with these little projects of mine and the money was well spent. I saved a bit doing it myself with the supplies I already had, but the important thing was actually learning how to do it on my own and knowing exactly how my setups will work. Now I just need to test them. Hopefully I inspired some of you with these, and please feel free to comment and make suggestions!

bigben91682 - 8-12-2009 at 07:17 PM

Well done on the Turbo Bar, let me know how it works. I completely forgot I was supposed to measure up my bar for you.....sorry about that, you should have bothered me more about it :^D Hope this works well, all those leaders look like they turned out very nicely.


Sorry again I forgot about measuring....i feel like quite the fool.

Jovver - 8-12-2009 at 07:21 PM

Nah Ben, it's quite alright... I was doing quite a bit of research on my own, I just would have liked to confirm it with someone who owns an Ozone Turbo bar, but its all good. I have a quite a bit of leader to play around with after the pulleys and a lot of adjustment with the clam cleat, so I should be alright. I'm getting really anxious to try this thing out!

soccerflyer - 18-12-2009 at 09:17 AM

Man, that is sweet!! Have you tried it out yet? What are you gonna try it out on? I would love to see how this thing works on a Blade!!!

Jovver - 18-12-2009 at 09:27 AM

Unfortunately I have not tried it out yet, every time it has been windy I'm either at work or it's dark out. I also only have one 4 line fixed bridle kite right now (my Flow) so that's what I plan on trying it out with. I believe the original Ozone Turbo bar was designed mainly for use with the Flow as well. It would be pretty cool with a Blade or any other lifty kite, considering most of the pull is directed on the harness as opposed to solely your arms. I'm really hoping to try it out this weekend, even if it's not super windy. I haven't been out for a session in over 3 weeks, and its the longest I have been without putting a kite up in the air...

*Edit* Also does anyone know how to change the transparency of a signature pic? Mine is ok for a white background post, but on the dark grey, you can see the white box... I would like to make it the same color as the background for any post...

Jovver - 8-1-2010 at 09:02 PM

Well, today was the first time that I've been kiting in over a month, and it was not as exciting as it could have been, but I got a lot accomplished. The main reason I wanted to get out was to try this bar out for the first time, and make all the necessary adjustments to get the kite to fly right.

Before I begin, let me say that this turbo bar setup is amazing, and I can only assume Ozone's s a little better because it is a bar in production and not a home brew setup like mine. Winds were only at 10mph max today, most of the time it was blowing around 6 or 7 mph, just barely enough to keep the kite in the air by working it. The thing that I noticed right away about this bar setup is that you need a lot of wind to get it to fly. The more wind the better the rig works, and the faster the kite will turn. I'm assuming this is because the rig is a bit heavy with the pulleys, the cleat, and all the extra line, so it is understandable. I also had to adjust my knots for the brake leaders a bit to adjust the bar to my liking. Generally, I like to keep the bar 3/4 the length of the CL line away from my body. In order to achieve this setup, I had to tie some knots about 2 inches close to the bar on the brake leaders, and the cleat was trimmed all the way out. I was surprised by this, as I designed it to be even when it was trimmed all the way in. I guess the Flow likes a bit more brake input than I expected.

As for flying characteristics of the rig, everything performed much better than I expected, even in the little amount of wind we had. Turning on the brake is extremely easy and just as quick as with handles. Also, as with any other bar setup, you can't manipulate the kite as well as with handles because of the motion constraint, but it is pretty damn close to flying on handles. I especially like the depower flying style with all the pull focused on the center of the harness, and I like the amount of variation you can have with the depower-like bar setup. Also if I feel over powered, I have enough CL line to simply pull the bar all the way in, and stall the kite. Overall, I am very happy with this setup and can't wait to try it out in higher winds. Again, if any of you are interested in making your own turbo bar setup, feel free to shoot me a U2U or email and I can give you dimensions and specifics.

soccerflyer - 9-1-2010 at 04:59 AM

Thanks for the update!!! Sounds fun.

Update

Jovver - 13-6-2010 at 12:43 PM

So I've been flying with this turbo bar setup for quite some time now (it has actually become my go to setup with the Flow) and I thought it was time for an update. The best part (IMO) of a DIY project/ setup is all the experimentation that you can do on the setup to make it that much better. After a few months of different wind conditions and settings on the bar, I have found a critical improvement that needed to be made on this design.

The improvement deals with the bar itself, specifically the area where your center line feeds through the bar. Any fixed bridle kite needs good break input when using a turbo bar (steering is directly dependent on break input), and my issue came from the difficulty of doing so. My bar was made from using a spare Slingshot depower bar (2005 model) that I wasn't using anymore. I have since upgraded to a newer (2010) Slingshot depower bar, and it has led to significant improvement. Here's why:

1. The ability to adjust the amount of break input is a crucial part to the success of this setup. The new Slingshot depower bars have aluminum inserts that have a larger hole cutout and have angled grooves cut parallel to the bar.

This is extremely important because it means that you can easily adjust the bar away/ towards you while the bar is in the turning position. The older model Slingshot bars have a plastic insert with a hole only big enough for the center line to feed through. I found that even during a simple turn, it was almost impossible to bring the bar closer or push it away from you because the line was pinched in the small hole. The aluminum insert is a little bit bigger, enough to fit a 5th line through in addition to the center line, and is therefore easier to move when turning. I am actually thankful that I didn't fly my Fuels on this bar for a long period of time, because it would have been even more difficult to turn.

2. The floaters have been eliminated. Since this bar is used on fixed bridle kites, you shouldn't be using the setup in, or near water, meaning there is no need for floaters. This small adjustment makes a huge difference. It gets rid of a lot of clutter on the bar and actually makes the setup a little bit lighter. Most importantly, it gives you a lot more line to adjust the brake strap location and you can make length adjustments on the brake leader lines.

Without the floaters you can get a nicely packed rig, especially if you are meticulous about winding your lines.

Overall, I am extremely pleased with the decision I made to upgrade this bar. The $75 price tag for a new SS bar alone (without floaters) was a bit steep IMO, but it was well worth the money to make this improvement. I would highly suggest to anyone making their own turbo bar, to use a depower bar that has an aluminum insert with angled cutouts for the center line because that feature gives a huge advantage.

Maven454 - 13-6-2010 at 12:55 PM

Yeah, the Ozone Turbo bar has a larger hole that allows for moving it in and out while turning.

arkay - 13-6-2010 at 12:58 PM

Nice upgrade; I like the large cuts outs in the center even w/o a turbo bar. I find that I can't sheet well when I'm turning w/o that style of cutout. I am finally in the process of replacing my last bar with a straight thru hole!

Those pulley's look like the bearing kind rather than the all plastic with a metal axel. The all plastic ones are typically used on bridals; do they really use the bearing type on bars? My montana has bearings (and I temp put them on my 12m atom) but I find they get junked with dirt and sand.

Jovver - 13-6-2010 at 01:04 PM

The pulleys I used were Ronstan Series 20. I'm pretty sure they are plastic with a metal axle and no ball bearings.

Kamikuza - 13-6-2010 at 05:22 PM

Interested in some dimensions etc if you don't mind :D

Jovver - 13-6-2010 at 07:12 PM

Kami, I'll take it out again tomorrow and measure everything out.

Kamikuza - 13-6-2010 at 08:39 PM

Ta! I think I can get the pulleys locally and I can make kick-ass leaders now :D

Kamikuza - 13-6-2010 at 11:16 PM

WTF? I know we shouldn't believe advertising, but how can the guy in the pic be using the product ... if he's not wearing a harness? :lol:

http://downloads.flyozone.com/landkites/downloads/Turbo_Bar_...

Maven454 - 14-6-2010 at 04:20 AM

The guy in the pic is wearing a Manta/Frenzy bag. He's probably flying one of those :D.

If you set the Turbo bar up with enough slack on the brakes, I'm pretty sure that you could fly unhooked and it would probably behave like a cross-over bar. Not sure why you'd want to, but you probably could.

Jovver - 14-6-2010 at 05:49 AM

I think Maven's got it. I can bring my trim strap all the way in to have it act like a crossover bar. The only real advantage of that over a regular bar is fast turning. (It would act like an HQ Scout bar)

Check out the video that I mentioned in my first post. He flies briefly unhooked and it seems to work just fine.


Kamikuza - 14-6-2010 at 06:21 AM

Wonder how much adjustment is in the brake leaders on the Ozone bar?
I got a bunch of parts and could make an identical copy :D I'm really only missing a good chicken loop - do I need the plastic cover on the chicken loop line?

Maven454 - 14-6-2010 at 06:45 AM

I can tell you when I get home Kami. I'd actually prefer being able to tighten my back lines just a little more (so if I pull the bar all the way in the kite stalls).

Jovver - 14-6-2010 at 07:01 AM

Quote:

I'd actually prefer being able to tighten my back lines just a little more (so if I pull the bar all the way in the kite stalls).


That's exactly how mine works when the trim is all the way out. It also gives for good arm positioning, not too far of a stretch from and not uncomfortably close to you. It's one of the most handy features of this setup IMO. This also gives you the ability to back the kite away from the edge of the window while buggying... something that is impossible to do with a regular 4 line bar.

indigo_wolf - 14-6-2010 at 07:14 AM

Quote:
Originally posted by arkey
Those pulley's look like the bearing kind rather than the all plastic with a metal axel. The all plastic ones are typically used on bridals; do they really use the bearing type on bars? My montana has bearings (and I temp put them on my 12m atom) but I find they get junked with dirt and sand.


Quote:
Originally posted by Jovver
The pulleys I used were Ronstan Series 20. I'm pretty sure they are plastic with a metal axle and no ball bearings.


Ronstan Series 20 use Acetal sheaves running on stainless steel ball bearings . 99.44%sure the Ozone Turbo Bar also uses ball bearing pulleys.

Ronstan Series 20 Convential Ball Bearing Pulley


The 2010 Ozone Depower kites use ball bearing pulleys in the bridle. They upped the ante by upgrading the to Ronstan Orbit Pulleys. Even if there is a catastrophic failure of the pulley axle, The attachment line for the pulley goes through the hub and will keep you from plummeting out of the air.

Ronstan Series 20 Orbit Pulley


ATB,
Sam

Maven454 - 14-6-2010 at 07:39 AM

I'll have to double check when I get home, but I'm pretty sure that the pulleys on my 2010 Manta M3 are the conventional series 20 and not Orbit pulleys. Are you sure that's not for 2011 maybe?

indigo_wolf - 14-6-2010 at 07:55 AM

This is the pulley on the 2010 Frenzy FYX


It would be weird to me that they used Orbits on the Frenzy, but not the Manta. Not unheard of, but weird.

More info here from Steve of KitePower.com.au.

The Ozone site is still rubbish for fine details. :mad:

ATB,
Sam

Maven454 - 14-6-2010 at 08:00 AM

Would be really strange, since the did a complete overhaul of the Manta for 2010 (M2 to the M3) but only did minor revisions to the Frenzy between the 2009 and 2010 models (both FYX).

I briefly had a 7m 2010 Frenzy and don't remember the orbit pulleys. I'd expect to remember since the orbit pulleys look slightly odd to me...

Middle of the product year change due to an issue?

PHREERIDER - 14-6-2010 at 08:07 AM

great project! love DIY. west marine is gadget heaven!

the orbit pulleys are spot on .

fun set up!

arkay - 14-6-2010 at 08:53 AM

Those orbit pulleys are sick. What kite and wind where you in there?

These were the almost full plastic bridal pulleys I was referring to:

indigo_wolf - 14-6-2010 at 09:45 AM

Quote:
Originally posted by Maven454
I briefly had a 7m 2010 Frenzy and don't remember the orbit pulleys. I'd expect to remember since the orbit pulleys look slightly odd to me...

Middle of the product year change due to an issue?


Wouldn't think it was a mid-year change as I expect any issues with anything in the Ozone depower line would have raised a bit more of a spike on the Richter scale.

Will drop Ozone a line tonight and see if they can clear things up a bit.

Maybe the vanilla Ronstans were used just on your Ozones.... you know how there is a conspiracy against you.... they did their best to keep you from finding out about the custom colors.
:P :wee:

ATB,
Sam

Maven454 - 14-6-2010 at 09:52 AM

I wouldn't expect a mid year change either. Though since they have their own factory, that'd be easy enough for them to do.

Maven454 - 14-6-2010 at 09:53 AM

The guy does say that Ozone has started fitting the orbit pulleys and he said that in April. I got my kites in mid January.

And someone else posted that he didn't have the orbits on his 2010 Access.

indigo_wolf - 14-6-2010 at 10:04 AM

Curiouser and curiouser.... incentive to drop them a email just redlined. If a early/mid-year change, really surprised there were no offers/documentation to retrofit (as the Megatron retrofit is fairly well documented on the Ozone site).

P.S. Sorry if this qualifies as a thread veer. From a geek perspective, it was interesting to me what Jovver used for pulleys as well as what Ozone used.... both at the bar and at the bridle.

ATB,
Sam

Jovver - 14-6-2010 at 10:14 AM

No prob on the thread veer, I'm interested to know this stuff as well. So do you think I made the right choice for the pulleys at the bar end?

Maven454 - 14-6-2010 at 10:20 AM

Wolf, if you do contact Ozone about it, let me know what they say, will you?

indigo_wolf - 14-6-2010 at 10:52 AM

Quote:
Originally posted by Jovver
No prob on the thread veer, I'm interested to know this stuff as well. So do you think I made the right choice for the pulleys at the bar end?


From my limited, bespectacled, propellor-beanie perspective.... I think the Ronstan 20s are a great choice. You could probably get by with lower spec, but sometimes geeky bling is good for the soul. The 20s are good bang for the buck, not overly weighty, and the bearings will spin-up if you even sneeze in their direction. The last time I was at West Marine, I picked some up for some mad scientist rainy day ruminations. :o

My two cents would be :thumbup: :thumbup:

ATB,
Sam

indigo_wolf - 14-6-2010 at 10:58 AM

Quote:
Originally posted by Maven454
Wolf, if you do contact Ozone about it, let me know what they say, will you?


You bet....

ATB,
Sam

Maven454 - 14-6-2010 at 12:10 PM

Kami, the back line adjusters on the Ozone Turbo bar have 4 inches of adjustment.
Jovver, the Ozone Turbo bar uses regular Ronstan 20 pulleys.
Wolf, I'm usually pretty good about details, but I figured that I'd check, my Manta M3's do have regular Ronstan 20 pulleys as I remembered.

Jovver - 14-6-2010 at 04:20 PM

Kami, here's the quick drawing with some dimensions that I promised. (Right click, view image, and zoom to see full size)

Pic removed.

Note that the drawing dimensions shown represent when the pulleys are all in line with each other. Also, I felt the brake strap needed to be a little closer, so I moved it to a new location. The dimensions referencing the brake strap are for said new location.

bigben91682 - 14-6-2010 at 04:44 PM

"drawing not to scale"

such an engineer.....hah!

Jovver - 14-6-2010 at 04:57 PM

Quote:

"drawing not to scale" such an engineer.....hah!


LOL. :P You mean the center lines on the pulleys, hidden lines in the aluminum insert, and dimension leader lines didn't give it away? If you're going to make a drawing, might as well do it right and let everyone know what's up! Honestly, I enjoyed making that drawing, I didn't feel it warranted the use of CAD, otherwise I would have!

Kamikuza - 14-6-2010 at 05:14 PM

Been busy while I been asleep, huh? :lol: Cheers Jovver & Mav!

Kamikuza - 20-6-2010 at 06:30 PM

Going to do a replica with trimmers on the rear lines ... for a start, anyway. May end up with a center line trimmer but we'll see ...
Trying to figure out a safety release for the center/power lines ...

Being a bit of a dick, I've measured up the pictures of the Ozone bar off their site and tried to convert them to scale ... are the "rear" lines on the outside REALLY so much long than the power lines in the middle, or does it change shape when you attach a kite ... hard to tell from the YouTube ...

Jovver - 20-6-2010 at 06:33 PM

Kami, take a spare leash (if you have one) with the push away tube releasing the pin inside. It's the same thing as a tophat safety. You could also buy a small piece of PVC tube, paint it red and make it yourself.

Kamikuza - 20-6-2010 at 06:40 PM

No spare leashes :( I've got some of those red balls though and there's plenty of tubing at the hardware store. I have like 6 Wipika leashes, but they use an O.S. handle with a big square headed pin ... pretty sure it'd work just as well ...

Kamikuza - 21-6-2010 at 05:10 PM

Picked up a Mystic leash for US$25 with a nice top-hat and pin release :) Learned a new way to lock in splicing too ... ready to get building!

... anyone know how to wash the foam on the bar so it looks nice and new? :lol:

Jovver - 21-6-2010 at 07:05 PM

The easiest way to solve that problem is to buy a new bar. :lol: But seriously, I don't think there is anyway to make a bar look newer than it is. Once that material is stained, discolored or marked, there is no changing it.

Kamikuza - 21-6-2010 at 08:28 PM

Mmm ... the blood didn't wash off my Kitewing either - it looks real hard core now :lol:

Kamikuza - 22-6-2010 at 07:24 PM

Oh ain't that typical ...

Seems the Ozone is related to the PKD Twister bar ... should have done a thorough search here first :lol: The PKD version is more like yours, Jovver and looks much easier to replicate.

Although I'm still bothered by the "backwards" nature of the trim strap ...

Jovver - 23-6-2010 at 06:50 AM

Yeah, that does look really similar to mine! (But I still like mine better :P ) Actually, I may add a brake line through the center for when the release is pulled. What is so confusing about the backwards nature of the trim strap?

Kamikuza - 23-6-2010 at 05:39 PM

Actually, nothing is confusing about your version I guess :lol: dunno what my head was thinking ...!

Do they need to be pulled in the whole time to get them to work? I notice the guy in the video didn't really "depower" at all ... I assume that the bar is setup to be flying perfectly with the bar fully in? I was hoping for a bit of space to 'pump' the brakes for a speed boost ...

Jovver - 23-6-2010 at 07:32 PM

Quote:

Do they need to be pulled in the whole time to get them to work? I notice the guy in the video didn't really "depower" at all ... I assume that the bar is setup to be flying perfectly with the bar fully in? I was hoping for a bit of space to 'pump' the brakes for a speed boost ...


As long as you have enough throw in the centerline, you can do pretty much whatever you want! To fly unhooked you may have to trim all the way in. I like keeping my trim all the way out so the brake lines are taught when the bar is in the middle of the centerline. I find that's a comfortable arms length for me. I can then "pump" the brakes as you said, and if I pull the bar all the way in I can stall and bring the kite down safely, or bring it back towards the middle of the window while buggying. It's all personal preference, and you will find out what you like best when you test out the rig for the first time.

Kamikuza - 23-6-2010 at 08:36 PM

Mmm ... now I'm oscillating wildly between an Ozone clone and a PKD clone ...! neither of which would be easier than the other but I spent $30 on a Best leash to get a top hat safety :lol:

Kamikuza - 29-6-2010 at 05:27 AM

Why not make both? :lol: I think it'll be easy enough to switch between the two - I got enough parts.

Here's the first one that I've finished - the Ozone clone.


Naish bar, Airush CL, Wipika depower line and trim straps on the brake lines, Harken 900kg pulleys, Mystic handle-pass leash safety & recycled the cover for the landing handle ... I had fun splicing lines left, right and center :D

Jovver - 29-6-2010 at 05:39 AM

Nice Kami! I think what you are going to find is that you are going to have to lengthen the brake line leaders. In flight, the point of attachment of the brake lines is closer to the bar than the power line attachments. If you let that bar out, your brake lines are only going to get longer and they are already much farther away from the power line attachment. Try knotting those white leaders at the very end.

Kamikuza - 29-6-2010 at 05:46 AM

Cheers!
It's to scale as near as I could figure from the original - 54cm they advertised the bar as so I printed the picture, copied it to 1:5 scale and then made the measurements :) 
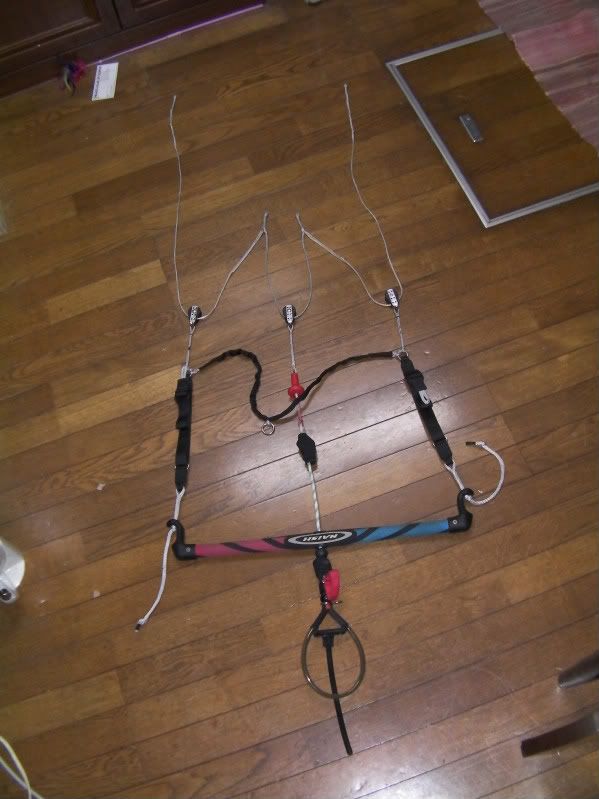
I think overall it's about 50mm longer from the pulleys to the bar ... we'll see - I left the length in the trim strap leaders so I could meddle ...

Oh wait you're talking about the leader between trim strap and pulley?

Jovver - 29-6-2010 at 05:50 AM

Quote:

Oh wait you're talking about the leader between trim strap and pulley?


I'm talking about the leaders between the bar end and the trim strap on the brake lines. You could lengthen the leader between the trim and the pulley instead.

Kamikuza - 29-6-2010 at 05:12 PM

But that'd make the brake lines even longer, wouldn't it?
I decided from the pics that the pulleys all lined up when the trim straps were right out, but they don't seem to have a lot of range in other pics ... I got about 4 inches on those ones :lD basically, if it doesn't work and I can't trim something ANYthing to make it work then it's well and truly borked :lol:

flyguy0101 - 29-6-2010 at 05:35 PM

@kami- he is recommended adding the length to the power lines in the middle which would actually shorten the brake lines. hope to have mine done this weekend:bouncing:

Jovver - 29-6-2010 at 06:27 PM

Quote:

@kami- he is recommended adding the length to the power lines in the middle which would actually shorten the brake lines. hope to have mine done this weekend:bouncing:


That's exactly what I meant. What I should have said to make it clearer was the leader between the bar and the Tophat, not the trim. <--- That was my bad.

Also, just some food for thought, make sure that when turning you have enough line to make a full turn without the connection points touching the center pulley. If that section of line through the center pulley is too short, you will cut your full turning potential short. Think about when you turn your kite on handles using the power lines only... the distance between the two handles has to be large enough to make a fast turn. Another way to look at it is a strop/ pulley situation. If your strop is too short, your handle will cut the turn early because it will hit the pulley. Instead of lengthening the leader lines, you could just tie new knots in the brake leaders above the pulley, as long as you can make a full turn.

Kamikuza - 29-6-2010 at 06:45 PM

I thought the power line looked short too, but it's correct according to the Ozone pictures :dunno: easily fixed, anyway ...! Now I know what you're talking about :lol:

I'm thinking the PKD clone will be better - I've got either the OR CL and depower below the bar or the Wipika line with a cleat ... that'd give massive range of adjustment and will be much cleaner :D

Jovver - 29-6-2010 at 06:47 PM

Sorry for being confusing and difficult. :embarrased: Also, its always good to have extra rather than not enough... you can always take material off, but you can't put it back on... unless there's something you are hiding from us! :ninja:

Kamikuza - 29-6-2010 at 08:30 PM

No worries - sorry for being dense :lol:

Kamikuza - 19-7-2010 at 06:02 AM

Took mine out for a play today, finally ... very low wind, perfect to make sure there's nothing going to break and kill me :lol:

Worked great with my Rebble 5m, didn't need to trim anything which means the power lines on the bar are too short - the Rebble won't fly unless there's another foot added to the brake leaders :lol: then tried it on the Ace 12m and had to trim the brakes a bit ...

Result = success! Turns real nice, the Rebble flew real good although I had to keep walking backwards to keep it in the air ... the Ace was easier to control than it was on handles and was a bit better behaved ... still over-flew and stalled a lot.
Was a bit tougher to reverse launch - lost a bit of finesse there ... hopefully with more wind (it was like 2 knots if that!) it'd be less hassle ...

Now for the PKD version :)

jimbocz - 19-7-2010 at 07:42 AM

I haven't read every post in this thread, but I've got to ask: Why build a copy of the PKD version? I've got it and can be barely bothered to use it. The line that is supposed to attach to the brake lines and then to a safety harness is tied with a slip knot kind of thing. Last time I flew it, the slip knot came undone, leaving the brake lines loose and absolutely slack while the power lines were still tied to me! Really scary.

Also, the primary realease (top hat) is tight enough that I couldn't pull the safety when I really needed it, which scared me again. Haven't flown it much since. Admittedly, I am new to hooking in and bought the turbo bar so I could hook in with some safety systems but I am not impressed so far.

Maven454 - 19-7-2010 at 07:57 AM

Well for starters, he could always correct those issues :smilegrin:.

Maven454 - 19-7-2010 at 08:01 AM

Quote:
Originally posted by indigo_wolf
Quote:
Originally posted by Maven454
Wolf, if you do contact Ozone about it, let me know what they say, will you?


You bet....

ATB,
Sam


Wolf, did you ever get bored and contact Ozone about the pulleys? I'm curious to see which set will be on my new Access XTs when they come in, since I know they'll have been just made.

indigo_wolf - 19-7-2010 at 08:09 AM

Blackholed in the general Ozone contact email. Went ahead and re-sent it to a direct email address at Ozone. Generally don't like to use that address lest I become a nag, but the lag time for a response has been rather long.

If your kites were "just made".... wink, wink, nudge, nudge... I am assuming you got custom colors..... sooooooo.... whadda ya get? ;)

ATB,
Sam

Maven454 - 19-7-2010 at 08:18 AM

My personal favorite set (dark grey leading edge, white stripe, and olive main panel). Isn't flashy and doesn't even look custom unless you really know your Ozone kites, but I love that pattern. Wish my Mantas looked that way, didn't realize how cheap it was at the time.

Sorry Jovver, we keep hijacking your thread.

Jovver - 19-7-2010 at 12:56 PM

Quote:

Sorry Jovver, we keep hijacking your thread.


That's quite alright. I started this thread to show off my DIY skills and hopefully encourage others to make their own turbo bars as well. I haven't used mine in a bit because I've had so much else going on. Haven't even really had time to try out my newest additions, which is really sad. I've been dying for a good session and there seems to be a lack of wind in my area during the summer months. Irdc if the thread veers because it will always come back to the original topic. Especially since Kami has stepped up and tried making his own turbo bars...

Kamikuza - 25-10-2010 at 07:08 PM

Oh here it is :lol:

I started in on the PKD version but ran out of line and the shop guy who I buy it from in Hamamatsu got all septic at me cos I bought an LEI off the internet, rather than from him at double the price :crazy: so development stalled.

I did, however, finish adding the red hat safety above the depower line with a leash back to the CL spinning leash ring ... if you release the safety at the CL the kite (should) be totally depowered ...

Kamikuza - 10-11-2010 at 05:35 AM

Got the Ozone bar tonight ... explains a few things - the depower throw is 20cm, I was working on the scale of it being 40cm and my bar & lines ended up being about 2 meters longer than it needed to be :D

Bloody nice bit of kit that Ozone jobbie ... Ronstan Orbit pulleys and all!

Jovver - 10-11-2010 at 09:46 AM

So which one do you like better... the home brew or the official fancy pants Ozone one?

Maven454 - 10-11-2010 at 10:39 AM

I don't know about Kami, but I have to say that I'd rather have a center trim strap instead of the two separate brake adjusters.

Kamikuza - 10-11-2010 at 05:54 PM

Yeah it'd be easier to manage a central trim, I'm sure. The Ozone bar is sexy though :D

My biggest problem for the Home Baked one is finding a decent safety solution - I've got a nice tidy one on there now but you're still leashed to the kite by the safety line ... adding another release to that would be a PITA.

I've got an OR CL that has below the bar trim, and I'm thinking that'd make a nice clean bar with a goodly amount of adjustment for the lines ... but there's still the safety issue :(

Kamikuza - 10-11-2010 at 07:16 PM

Ok to explain my safety as it is at the moment ... yes I'm bored at work again!

It's a red hat with a pin like the Ozone one, but I've drilled two holes in the hat lip and run a "safety" line back through the bar to the CL, where it goes through a spinning metal loop on the non-released side of the CL ... the Airush CL is captive but releases the bar, depower line etc with a pin and strap.

There's a loop on the end of the "safety" line so you could hook a leash into it if you wanted to ride suicide and have full depower safety if you let the bar go.
Of course, you can pull the hat to release the front lines but also, if you pull the safety strap on the CL it releases the front lines ... the problem being, if the kite is wrapped around a truck or something you've still got the safety line attached to you. Similar issue with KKs I guess but you'd have to get out of the CL ... I suppose I could not run the safety line through the loop and just use a velcro strap to keep it tidy ... hmm ...

The other option for safety is rear lines flag - a brake strap like on the Ozone with a line back to the bar, leashed to you with a regular leash. That'd have the safety line flapping around under the bar which I don't like so much ... would mean I could use the OR CL with a dual line for trim and it'd be real tidy ... hmm ...

... and I still need to order line! :o