
flyguy0101 - 16-12-2010 at 06:36 PM
Have been working on some new pigtails as well as building a turbo power- I wanted them to look good thought, so I have been learning how to do an
eye splice. Check out the results, it turned out easier than i thought. Yeah I know it would have been nice to have them in different colors but
wanted to use what i already had. You cant see it in the pics but i used colored electrical tape on the ends for red and black
Scott


shehatesmyhobbies - 16-12-2010 at 06:49 PM
Looks pretty good Scott! :bigok:
B-Roc - 16-12-2010 at 08:46 PM
Did you use a splicing tool or how did you do it?
PHREERIDER - 16-12-2010 at 09:08 PM
very nice
this is why we're here! champion !
Kamikuza - 16-12-2010 at 11:25 PM
Not bad!
... but you can do better  IMHO there are 3 better methods ...
1. A simple eye splice with stitching
Don't worry about locking the line by splicing it back through itself if you're going to stitch the end inside the line ... once a line is spliced
inside itself, it will not (in theory) slip. We lock the line by stitching etc to stop it coming back out when the line is not under load ...
On a sewing machine is the cleanest (what the factories do) ...

or you can lock it by hand with a staggered stitch thingy ...

2. Zacher Knot
A simple eye splice but you pop the line back out, knot it then feed it back in and pull the end cleanly inside. Very neat, needs no stitching but
does leave that knot there ... can be useful for making pigtails though!

from http://www.stormriderkites.com.au/zacher-knot.htm
3. Brummel Knot
Most technical but the cleanest and neatest. There are video's on YouTube on how to do it - I had to figure it out on my own :D when you get the hang
of it, it locks down real tight and you can't hardly tell the locking part of the splice is even there ...
flyguy0101 - 17-12-2010 at 06:59 AM
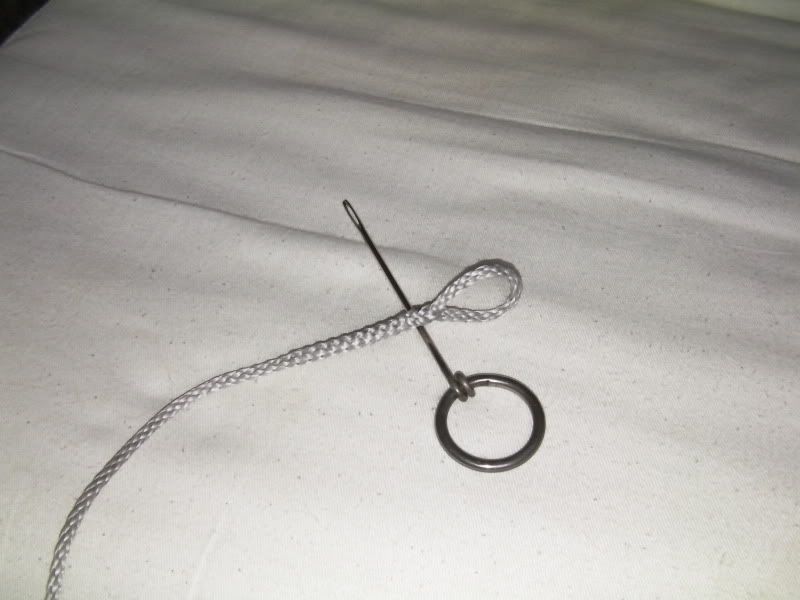
Broc- I had bought a piece of aluminum tube to make a Fid but it ended up being the wrong size so i just made a hook using a piece of then metal wire
and folding it in half. The wire was from a tent pole repair kit so it is very thin and stiff- i will shot a pic tonight.
Kami-
Yours look very good- that was my original intent - to feed it straight in but the site i found on making the splice recommended pulling the tail all
the way thru each side twice before hiding the remaing tail inside. the stitch was done by hand with the stagger stitching thing since was too lazy
to pull out and set up the sewing machine
acampbell - 17-12-2010 at 07:46 AM
Good job Scott. Did you use the method described on the Amsteel web site?
Kamikuza - 17-12-2010 at 08:04 AM
Try it out - just splice it in, then pull on the eye ... you shouldn't be able to pull it out, the friction keeps it in place - especially if you
larS-P-A-M-L-I-N-K-s head it to something ... putting the tail through is unnecessarily ugly :D as without the stitching it can still slip through
when unloaded. The Brummel requires active unpicking to get it apart :o
With the stitching, the 'official' way is to go down, the rotate 90° and go back up ... always thought it looked messy so I did my own thing too
I've discovered that you can 'zig-zag' stitch by hand, carefully going with and across the threads of the Dyneema, and it looks like a machine did it!
If you're lucky, sometimes the stitches totally disappear under over-lapping threads in the Dyneema! I try to match the thread with the colour of the
line too ... white on grey (silver) is almost invisible.
... then you'll discover you can splice 3mm inside 5mm and have a kickass depower line for the single line depower bars; splice a thin bungy line in
there and have your own safety line - the possibilities are endless 
geokite - 17-12-2010 at 09:56 AM
I spice and sew most of my loops when making bridles for arcs. I made a charger bridle for my 19 synergy, but the pulleys I used have a small
passage behind the wheel. I couldn't get the spliced loops through. So I ran unspliced loops through, the formed the loop after going the pulleys.
I didn't sew that final loop to keep it from pulling though when very little tension is on the line. Instead, I just put a single overhand knot in
the splice. This way I can change the charger bridle back to the original bridle without cutting that line off. Hope that makes sense.
krumly - 18-12-2010 at 09:50 AM
Here is page with simple step-by step illos for a locking brummel splice in singlebraid:
http://www.neropes.com/SPL_12Strand_EyeSpliceBrummel.aspx
Not much harder than a standard splice, and can't slip out. No security stitching required. Use a piano wire fid - I'll post a pic of mine.
krumly
Kamikuza - 18-12-2010 at 06:17 PM
That was the page I learned from Krumly ... the videos on YouTube are much easier to understand for me Got bored one night and did a Brummel in a 1mm braided nylon line just ... cos I could :D
Fid pics
krumly - 18-12-2010 at 10:21 PM
Here are a couple shots showing the fids I make. I have the welded fid in Kami's bottom pic, and a set of Samson tubular fids with pusher. The ones
I make are by far the easiest to use on single braid. I have several to splice line from 50# spectra kite line up to 1/4" Amsteel.
Take music wire, bend the eye shape with jewelers or needle nose pliers, then chuck the long ends in a drill and wind the shank while holding the eye
in a vise or pair of pliers. Drill a hole into a dowel or chunk of broomstick 2-3" deep and epoxy the shank in (wet the hole out really well).
And I get to one up ya, Kami - I've spliced 100# Spectra Proline - about as thick as button thread.
krumly

Kamikuza - 18-12-2010 at 11:38 PM
You mean, big ass needle heated and bent around a ring fid that was a home-made
jobbie ... I think the ones in your pic are both easier to make and use though! Nice! I'd still like a push fid but can't find anything here, even
small knitting needles 
ok you win ... but for pure pointlessly, my next contestant is a Self Landing
handle ... just to see if I could :D


