Power Kite Forum

OffAxis Oblique Buggy Build

 Pages:  1  

OffAxis - 11-6-2016 at 05:33 AM

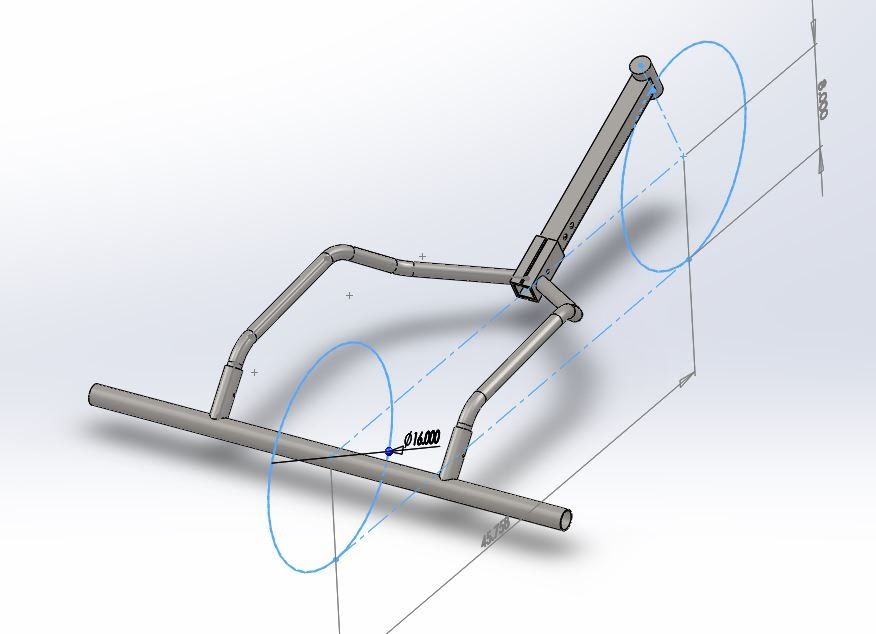
I've been getting the itch to join you awesome folks at WBB and should probably get my self a buggy before that event. As I researched my options, I can't believe how expensive a simple buggy chassis is. So I've started working on designing my own kite buggy and want to get input before I dive into fabrication. Admittedly, it is a clone of the PL Classic buggy that I found on popeyethewelder's site. I need all of your experiences to help me make this into a nice affordable starter buggy.

My goals for the buggy are as follows:

Keep cost down: I think I can fabricate something sweet for less then they can be purchased
Sturdy frame but not crazy heavy and overbuilt: I'll use tubing sizes that are available in my areas.
Stainless or Steel: Probably steel to start, but will price out stainless option for comparison.
Seat: Find a seat that fits or make my own.
Other things: hitch plate to attach a second buggy, make a ski option for winter time, other hard mount points for accessories, splash guard option, seat belt option.

Ultimately I would like to make this buggy available to the community as a dependable budget buggy allowing more people to get into kite by bringing down the barrier to entry. The plans and info will be open source. If there is enough interest I could make the buggy available for sale. I envision that they could be sold either DIY weld kit or finished product.

Things on my list to do:
Finalize the frame shape design
Design front spindle and fork
Design rear axle inserts
Build a BOM
Source tires and rim options
Get quotes for all parts from local metal shops
Get pricing for everything else
Build first buggy
Test it out at WBB!!!
Kite Buggy!
Design Skis for winter

Current Frame Tubing Sizes:
Rear Axle: 1-1/2" x .083" X 37.5"
Rear Axle Sockets: 1-1/4" x .083" x 5" qty. 2
Rear Axle Threaded Inserts: Custom 20mm threaded inserts similiar to 1.5"x.120" x 3/4"-16 Threaded Insert
Rear Bearing Spacer: 21.25mm ID X 25.75OD X 47mm Long
Wheel Bearing: 6204-2RS Precision Sealed Bearing 20mmID x 47mmOD x 14mm Wide
Rear Axle Bolt: M20x120mm with Theads to match axle insert
Seat Side Frame: 1" x .083"/.120" x 35" Left and Right
Down Tube: 1-3/8" x .083" x 20"
Clamps halves: Flat Laser cut plate
Front Spindle" TBD
Rear

Tires: Barrow Wheels or Midis. I'm probably going with Midi. Don't use steel barrow rims. Purchase the proper PeterLynn Plastic rims, they are not that expensive and work great.

Let me know what you think!


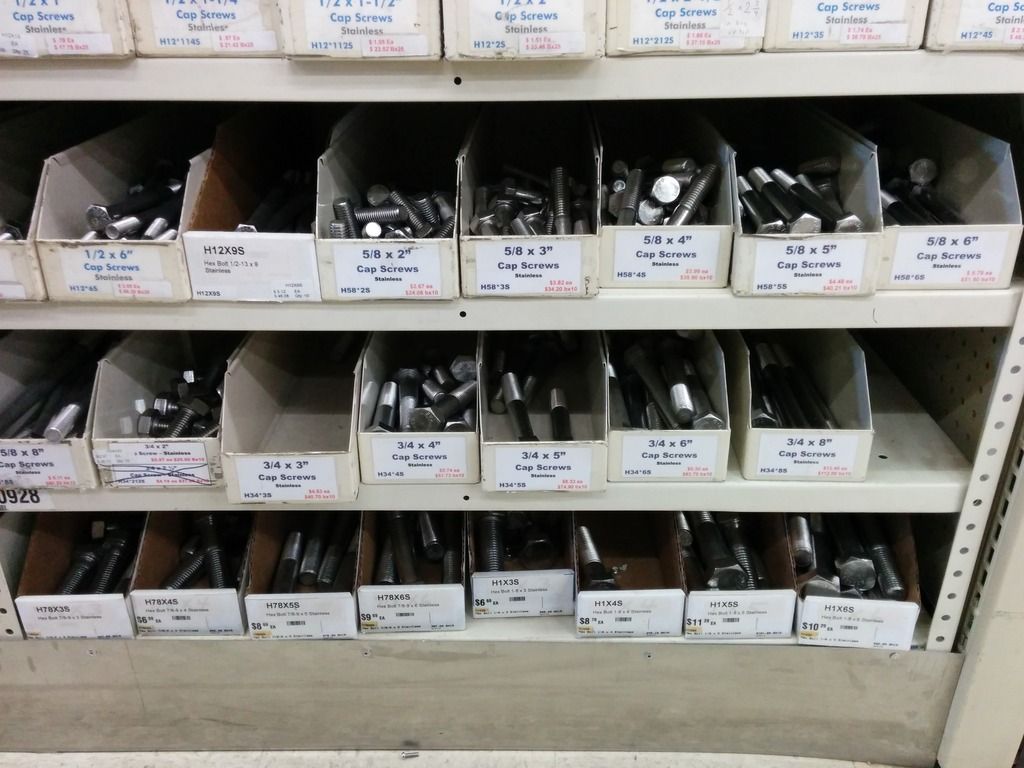
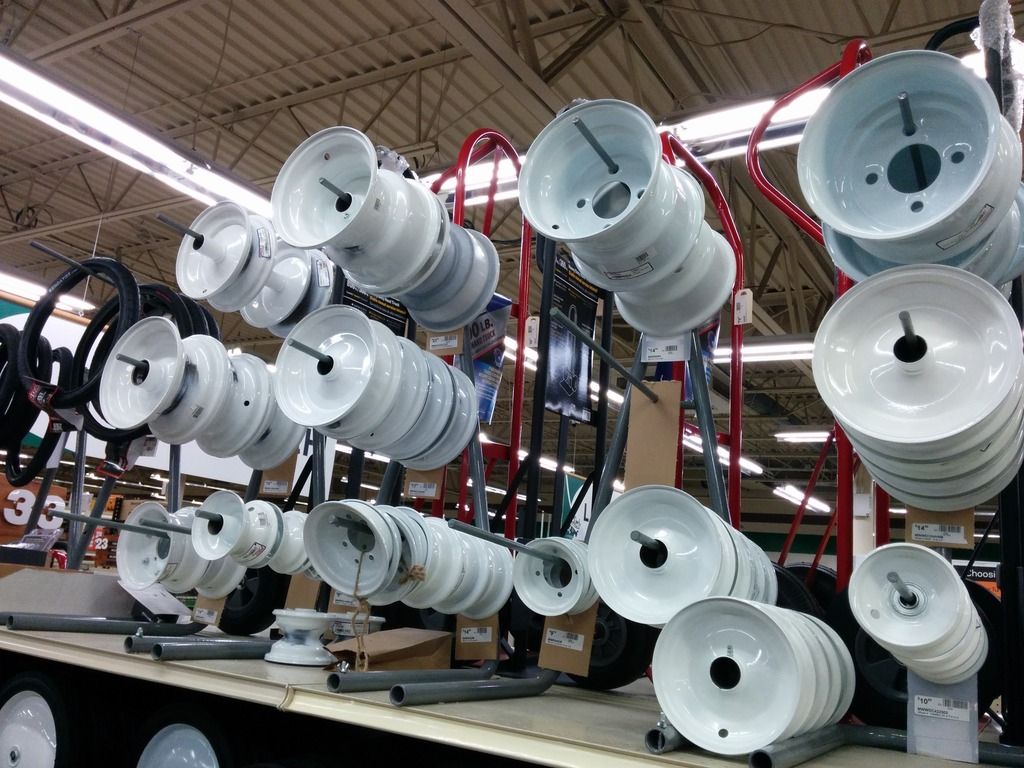
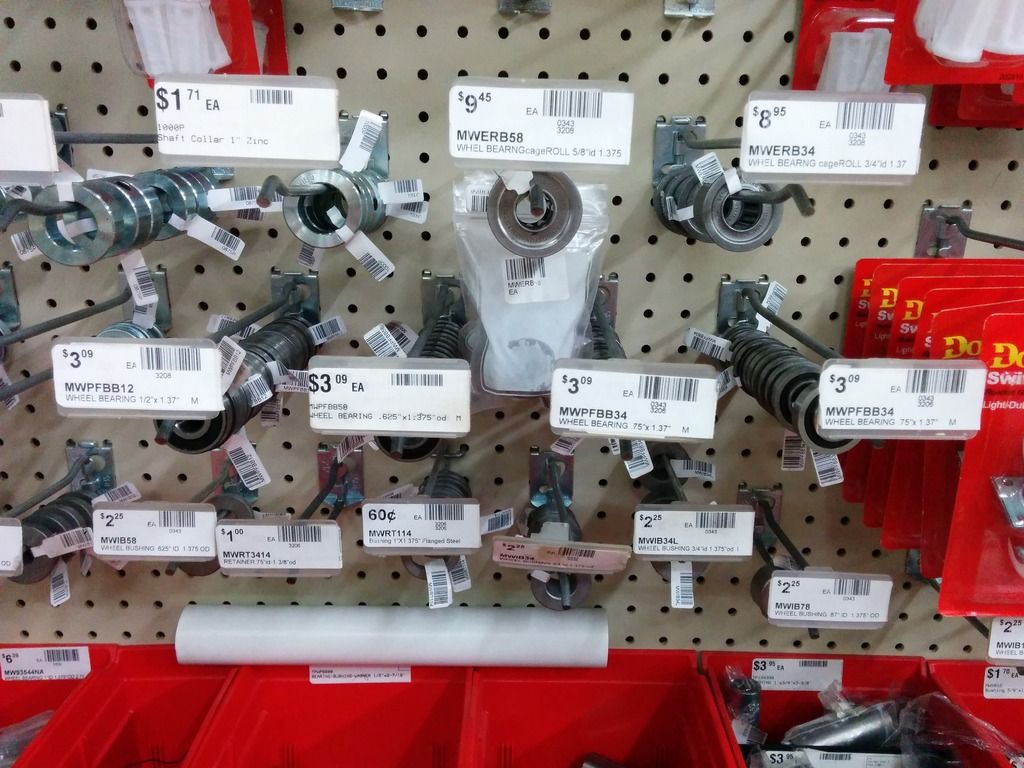
I love my local hardware store:


OffAxis - 11-6-2016 at 05:35 AM

Reserved for updates.


Can someone explain how to attached pictures to the forum. I'm slightly confused why it won't let me attach more then one photo.

OffAxis - 11-6-2016 at 05:35 AM

Reserved for updates.

3shot - 11-6-2016 at 06:23 AM

Copy and paste image URL in your comments from an outside photo site. Flicker, photo bucket, etc.

ssayre - 11-6-2016 at 07:16 AM

good luck on your build. something I've always wanted to do but have never gotten around to it.

bobalooie57 - 11-6-2016 at 09:12 AM

Good idea to post as community buggy, but in reality, once you get the materials priced out and account for your time, mistakes etc., you are likely going to come out close to what a new buggy will cost, and although they are not common, a used one will come in cheaper. Plans can also be found at popeye's site, as well. Cost of entry into this sport, though vexing, is a good thing, really. It forces you to be thoughtful about how you spend your initial $'s getting in, and makes most of us go slow in our purchases. Well, once your credit card is maxed out!:o

abkayak - 11-6-2016 at 09:17 AM

I've bought 3 used bugs(barely) 2CL...350$ was the most...it's a timing thing

Bladerunner - 11-6-2016 at 12:03 PM

I suggest you try and contact Van.

He had the same aspirations as you do + the equipment to build right. Even made custom seats. After a few years he has put the project to the side. He will be a wealth of knowledge and possibly give you some insight into the value of your efforts.

I am not anti home build. The whole home build movement pushed buggy design forward when it was in a big stall. As mentioned if you shop around you are likely to find a used buggy at lower cost than the combined parts in about the same amount of time. Especially if you are looking for a standard model like Peter Lynn or Flexi. Here are some buggies that would get you going cheap as an example. http://www.powerkiteforum.com/viewthread.php?tid=32086

Cheeks - 11-6-2016 at 05:21 PM

OffAxis, Every so often a newbee pops up here going to build his own buggy, harness and even homemade kites.

Those of us that are firmly entrenched in the sport/hobby at one time, have had those same thoughts but thought it was a better decision to bite the bullet and buy ready made gear.

We made that decision because of safety, time restraints, material access, proper tools, a most of all to get out and start flying and riding as soon as possible.

You need to really research the used market and stay on it till you get quivered up. There's a lot of equipment out there for sale. Work it every day and you'll find most everything you need sitting in your arm chair and not sweatin your ass off in the garage making bad welds.

All sports/hobbys have an entry point. It always $'s & cents. Many sports have a much higher entry than kite buggy. Drag racing, dirt track, skiing, motocross, para gliding, sky diving, etc..... Would you want to make your own parachute to sky dive?

The used market as posted earlier, is a matter of timing and tenancy. Your investment in used beginner equipment when ready to sell most likely will get your money back if you decide to move up and grow your quiver or get out.

Most of us that have made the investment in our sport had to save up $'s. We had a good idea what we needed, a good idea what we might have to spend and then started shopping at that time for equipment that was on the market. Several of us also made payments on a certain piece of gear and paid it off, got it and then the fun started.

Popeye is a master welder/fabricator, has letters behind his name, a professional. Yeah, he makes it look easy because he's very very very good!!!!!! I would not try to do what he does if I were you.

A lot of smart people have spent a lot of time, energy and resources to figure out the designs of equipment that work for our sport and then manufactured it. Buy it rather that build it!

JMHO

hiaguy - 11-6-2016 at 08:56 PM

You never know when a buggy will pop up:
https://m.facebook.com/groups/126278344388/permalink/1015375...

ssayre - 11-6-2016 at 09:20 PM

What cheeks said.

Blitzhound - 11-6-2016 at 11:57 PM

OffAxis:
I think you should do what ever makes you happy. These guys telling you to stick to what's out there are tools selling you a line of BS! If you have the skills to make your own buggy. Then more power to you brother. But they're not wrong you can take the easy way and just buy some over priced hunk of #@%$#!. If you want a good buggy like a Libre, pick a model. Your going to pay out the ass and you're probably going to have to wait for someone to die for one to even come available. Sure you can scour Craigslist and the forums everyday waiting for that right buggy to come along like the rest of them did because they either lack the skills or they're just to lazy to do it themselves. I too am in the process of making my own buggy. I have been an industrial engineer/mechanic my entire life. Stuff like this is what I do everyday. I'm a licensed engineer, certified welder, licensed boilermaker, shall I continue...my point is fabricating something as simple as a kite buggy is child's play. You just need to make sure you get your geometry right. Things like Rake and trail, weight distribution. Sure it's easier to go buy you #@%$#!. But then your just like the rest of them. If you have the skills to do it then there is no greater satisfaction then being out there riding a buggy that you built yourself. Popeye a MASTER? His geometry is all wrong. Have you ever riddin one of his bugs? Based on your statements I'd guess no. Neither have I. But I have looked at his plans and his bugs and I'm willing to bet they're not well balanced. Math doesn't lie. I normally don't get involved in the forum drama. But I can't in good conscience standby and watch these people try to squash your ambition. If you have questions feel free to U2U me. As for the rest of you...I say shame on you.

abkayak - 12-6-2016 at 03:23 AM

Wow...well their you go, guess I was wrong...avoid the drama?

ssayre - 12-6-2016 at 06:28 AM

blitzhound, no one here is against someone building their own buggy, but the reality is you don't save any money by building one. I think they were just pointing that out.

Chook - 12-6-2016 at 06:44 AM

Quote: Originally posted by ssayre  
blitzhound, no one here is against someone building their own buggy, but the reality is you don't save any money by building one. I think they were just pointing that out.

Having now built 5 you are dead right. It is only that you have a buggy that meets your needs exactly (or can be further modified to do so) Get a kick out of riding something you have designed and built yourself. The time taken to build them easily exceeds the purchase cost of a production model if you took labour costs into account.

OffAxis - 12-6-2016 at 10:16 AM

Well this wasn't quite to feedback I was expecting. Regardless, I'm still interested in features or designs of buggies that you guys like. Also it was mentioned that weight distribution, rake and trail are important. Any input on those parameters?

Bladerunner - 12-6-2016 at 10:24 AM

Blitzhound,

I think you are missing the points being made and reading them as instruction.
1st off, I hold Popeye and a few others up as the folks who took buggy design and building to new levels. I think if you knew the man, had a chance to see and try his stuff you might treat Him with more respect. He never claimed to be the last word on anything. Last I heard He was riding an Apexx extreme.

OffAxis is talking about taking this even further and building for the community. If you had been around the community longer you may know some of the history. I referred Him to Van who came in and did exactly what He is talking about. The experience soured for Him, Popeye and others. He really is better off talking to somebody like Van who has been through exactly what OffAxis is after.

OffAxis isn't talking about building a Race type buggy. He is looking to clone a Peter Lynn buggy that you can buy used, complete RIGHT NOW for only $125 . As mentioned in my 1st post, I am not anti home build. I do however think that if you are going to all that cost and trouble you should try and build something more than a Peter Thin clone! Van already has designs and was putting out great kits to upgrade PL. HE can give this guy real insight.

volock - 12-6-2016 at 11:47 AM

Quote: Originally posted by OffAxis  
Well this wasn't quite to feedback I was expecting. Regardless, I'm still interested in features or designs of buggies that you guys like. Also it was mentioned that weight distribution, rake and trail are important. Any input on those parameters?


I can't help on those, but I'd definitely recommend talking to Popeye/looking up his stuff, as he experimented a lot on those.

One point to keep in mind for designing will be planned wheels/tires and compatibility for them. I own a Sysmic S2 and it's the generation before they redesigned the front to fit a proper large wheel (either tall disc or balloon for the beach). These can also have some affect on the steering and affects from the other. I have two extra sets of wheels for mine currently, a set of midis (it came with), a set of smaller motorcycle wheels that I can run all 3 wheels on for lower traction since my usual surfaces I don't sink in on (and were picked up cheap, for when I don't want to deal with handling issue from the last), and lastly a set of wheels just for the back that are super light motorcycle wheels that are extra tall. Reason for those is I wanted easy extra ride height for the easiest to get to field, so I could keep my seat low slung, without the occasional hitting bottom on the rough grass spots/transitions for where I get out most. I can't fit the same size wheel in front, so it handles a bit differently different size wheels (significantly) for the front and two rears.

I'm excited to see where this goes. I was planning on welding up my own buggy and trying out a few ideas, not sure how much I'd save over a used one, but I enjoy fabricating and the experience would be worthwhile, but then I moved rental houses, and none of the outlets in my garage will support my welder (they all trip, despite claiming to be their own 20 amp service and my welder not drawing that much), so I bought a used one here, which will probably last a lifetime, and the build will wait until I decide I want a dedicated freestyle or my wife wants her own and not just the adjustments I made to mine for her to fit.

crewl1 - 13-6-2016 at 08:16 AM

@OffAxis here is a source for various wheels. http://gokartsusa.com/Gokart-Wheels-Minibike-Tires-Parts.asp...
The 8" aluminum tri-star or spinner will fit the typical 4.80/4.00 - 8 barrow tires.
This type came on a used buggy I recently purchased so it is how I learned of these.
This is a better choice than the typical steel lawn barrow wheel because you can fit proper sealed bearings.

BTW the $125 buggys have been sold locally.

OffAxis - 13-6-2016 at 10:16 AM

Is there a problem with steel wheel barrow rims? Is it just a weight issue?

crewl1 - 13-6-2016 at 10:36 AM

I think the bearings are poor quality and may have some wobble, and could also break down at high speed, but I have not tested them.
Also not sure they could handle side loads of a kite buggy well.
Just observation from handling the ones on garden equipment.

OffAxis - 13-6-2016 at 10:44 AM

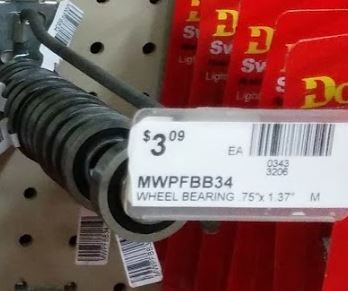
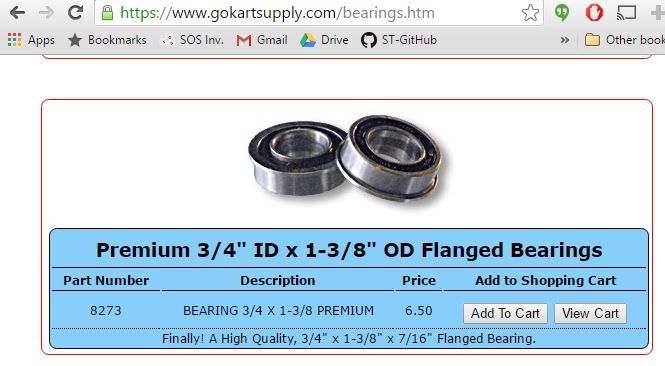
Taper bearings would take the axial loading much better then a standard ball bearing. But I think this bearing should be fine: http://www.bmikarts.com/Flanged-High-Speed-Wheel-Bearing-34-...

I also think it is the same bearing hanging on the shelf at the hardware store:


It should fit into the hubs of those steel rims.

crewl1 - 13-6-2016 at 10:49 AM

Oh I just saw your pictures link. Seems your shop has a lot of options. If there is a way to use sealed bearings in any of the wheels I would try for that, especially if you plan to ride in beach areas.
They can be found fairly cheap on eBay, just spec the outer diameter, inner diameter and width.
I just ordered some of these for some used peter lynn wheels I bought.
http://www.ebay.com/itm/381654993188

OffAxis - 13-6-2016 at 10:57 AM

I'm beginning to find that i cannot find a precision sealed ball bearing with a 3/4"ID and 1-3/8"OD. See the note found in this product listing: http://www.azusaparts.com/ProductPage.aspx?catID=8&subCa...

If I reduce the axle shaft size to 5/8" it opens up options to having premium seals bearings with 1-3/8"OD.


This is the only one I could find in the 3/4"x1-3/8" sealed bearing size.


crewl1 - 13-6-2016 at 11:26 AM

yeah I think the 1-3/8 is 35mm which makes it tight for a 20mm ID.
Lots of options for 5/8
Note original PL Buggies used a 12mm bolt, then went to 15mm, then to 20mm.
5/8 is just a tad over 15mm so that may be fine.

OffAxis - 13-6-2016 at 12:04 PM

For simplicity, I think i'm going with all imperial hardware. So my axles will be either 5/8" or 3/4"

In other notes: A rear axle tube of 1.5" x .083"wall will deflect some where between 3/16" and 1/4" under a 600lb static load. So that should be plenty strong. The weld joint for the seat frame should be the first location of failure on the rear end.

WELDNGOD - 13-6-2016 at 01:26 PM

When I built my buggies ,I went with 1-3/8x5/8. Then I upgraded wheels ,and they were 20mm ID. So along came the 20mmx5/8" flanged adapters. I think I got them from Kent @ AWOC. Works a charm!

WELDNGOD - 13-6-2016 at 01:30 PM

Yeah, here it is... http://www.awindofchange.com/product/20mmwheeladaptors.html I ran a 5/8" bit through each one .

shehatesmyhobbies - 13-6-2016 at 05:38 PM

I say go for the build, if you are of tall stature, make it a little bigger so you will be comfortable. I built my second buggy, and I used schedule 40 tubing for my forks and side rails, I used 1x3 stock hollow stock for my swan neck and even got a friend to build a dual tuned aluminum rear axle with braces. (Less than $200 in material cost) it held up me for 8 years and it is now being used by another rider currently and he's still having a blast. I used cheap PL plastic rims ($25 ea) with Nanco tires ($33 ea) and made the whole thing so it could be taken apart in just a few minutes with tractor supply spring clips ($4 ea)

Popeye used to have diagrams of angles and such to help people along and for a while was even selling his plans for buggies at a decent price.

It was a great experience for me to build my buggy, even my seat, thanks to the wife, and I got a pleasure riding it every time I sat in it.

OffAxis - 13-6-2016 at 07:04 PM

I'm beginning to find that it is extremely difficult to find plastic rims similar to the PL Rims but with a imperial bore. I'm wondering if I should go straight to 20mm axles and just suck it up and use the PL wheels and bearings. Price wise I think it is a wash between the steel wheelbarrow rims vs the PL rims.


rtz - 13-6-2016 at 07:55 PM

6204 is the bearing for the PL wheels. 6204's with a 3/4" ID are listed on eBay vs's the standard 20mm ones if you want to use a 3/4" bolt or stud for your axles:

http://www.ebay.com/itm/6204-2RS-12-6204-2RS-3-4-1-PC-FACTOR...

Have you considered welding a 3/4" nut into your axle tube? Popeye has a video on building the axle where he welds the nut onto a round disc to center it and welds that into the axle tube.

Show me a close up of the center of a metal wheel that you were looking to use and what type of bearing setup it uses.

OffAxis - 14-6-2016 at 04:26 AM

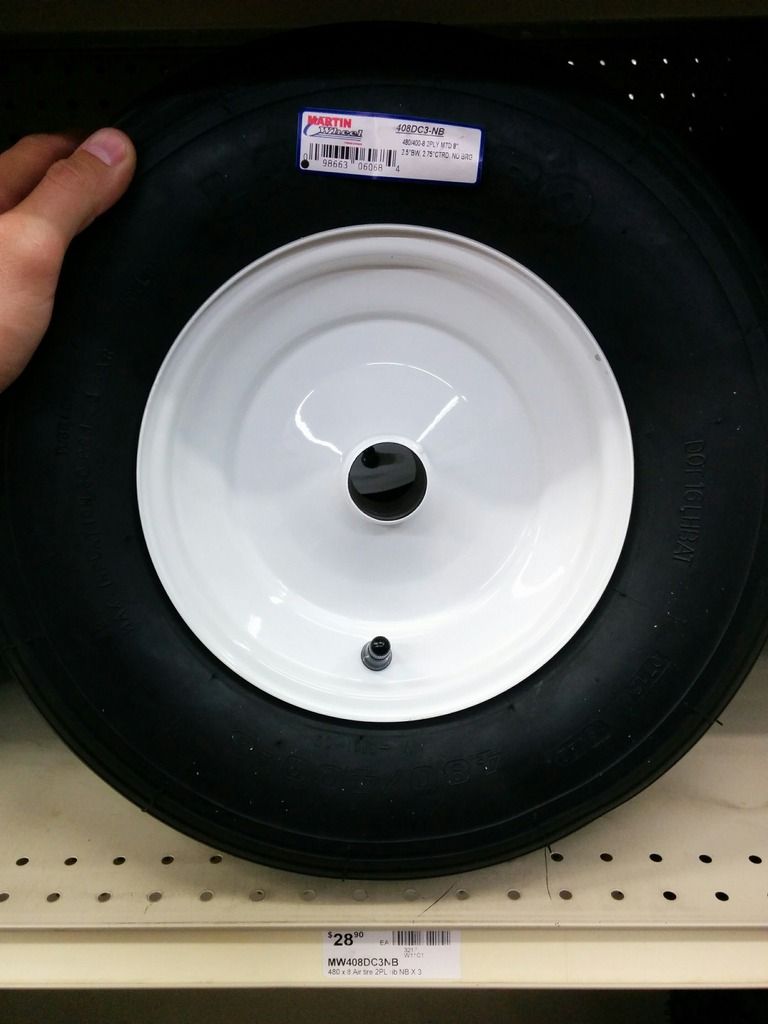
I was thinking of using these wheelbarrow rims. But might purchase the PL plastic rims because the price is very similar.

These are the bearings that are compatible with the wheelbarrow rims:


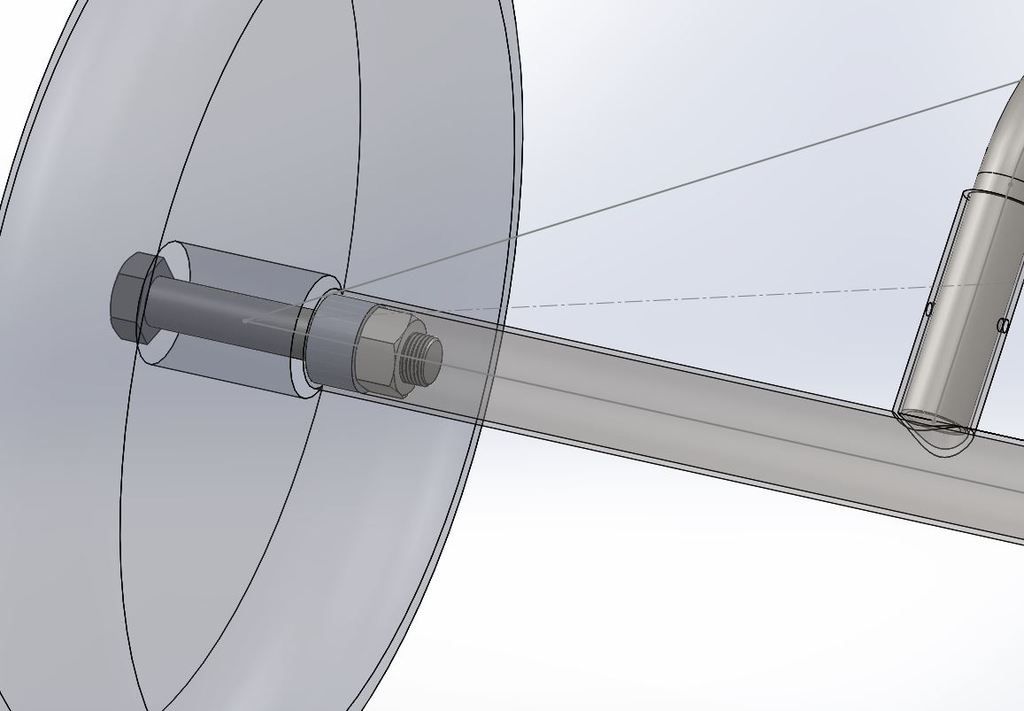
I have watched the popeye video and plan on doing the same. It will look something like this:


WELDNGOD - 14-6-2016 at 05:24 AM

Been there done that... The weld will crack. Get the PL wheels.

Chook - 14-6-2016 at 05:12 PM

Don't use steel if you can avoid them. They rust around the valve and trap moisture between the halves. As soon as they chip they look like crap. Salt yellows the paint on the rims too.
I just replaced these sort of rims on a "Pelican" yacht jinker. They we not 12 months old. The bearings in them were complete crap too. The rubber seal didn't even run in a groove on the inner race.

I haven't bent an 3/4" axle (but use Hitensile bolts) but have changed all my 11 landyachts and 3 buggies over to 20mm to keep them all standard. I only have 2 sizes of bearings and use high quality Stainless steel bearings.

John Holgate - 15-6-2016 at 02:26 PM

Eventually, you might want a nice set of alloy Sysmic rims - so go with the 20mm. I used some threaded gal rod on this one... http://www.extremekites.com.au/gallery/image/132-vermin-stub... Rather than use a bolt, I have also inserted some 20mm rod into my Vmax axle and locked it in place with a nut....then I slide the tire onto the threaded rod and put a nylock on the outside. This has been easy to take on and off and doesn't come loose.

OffAxis - 15-6-2016 at 02:50 PM

John, why don't the treads get damaged from the bearings. I don't think i'm going to design a rolling element to be supported by bolt threads.

Does anyone know of a source of M20 bolts in the USA other then McMasterCarr? Or an internet store that ships to the US. I can't find anything and until I do I think I'm gonna stick with 3/4" or 5/8".

WELDNGOD - 15-6-2016 at 02:53 PM

Grainger or McMaster-Carr

ssayre - 15-6-2016 at 03:07 PM

do you still the angle of the fork? I could check mine for you if you still need that

Bladerunner - 15-6-2016 at 03:47 PM

People have tried to reinvent the wheelbarrow wheel from times before actual buggy wheels were available CHEAP!
There are all sorts of reasons the wheelbarrow wheels don't work in the long haul.
You are throwing good money at a bad idea IMHO. Go with cheap PL plastic wheels and 20mm bolts. NOT doing so will not allow you to easily change out to better buggy wheels down the road.

I thought your side goal was to build so others can buy your stuff? Going imperial won't be of much value to others?

John Holgate - 16-6-2016 at 12:53 AM


Quote:

John, why don't the treads get damaged from the bearings. I don't think i'm going to design a rolling element to be supported by bolt threads.


It doesn't spin against the threads, in fact its the bit of the bearing the nut comes up against and locks the wheel in place. I've done a few thousand km's on this setup so far on both buggies and the threads are still fine and it's easy to cut a new bit to length if I need to. Beamer Bob put me onto it a few years ago. Easy to source locally too rather than try and get 20mm SS bolts.

OffAxis - 16-6-2016 at 04:38 AM

Bladerunner: I would agree. Not going with 20mm does make things more challenging when it comes to choosing wheels. But with a simple bearing change out to 47x3/4"x14mm I think all the problems go away. So its not the end of the world. Once i begin looking into what spacers are readily available it might make the decision easier. The reason I lean towards imperial hardware is because it is way easier to get then metric.


John: You are correct, it does work. The decision to make sub shafts like that is probably because it was a cheap solution. But I'm of the opinion that it is a poor design choice to have bearings supported by threads. The threads and bearing can become damaged easily if things loosen up. To me, I believe it is worth the slight additional cost to avoid this scenario.

ssayre: I would be interested in knowing what a common fork angle is.

BeamerBob - 16-6-2016 at 07:48 AM

I got the threaded rod stub axle idea from Popeye. I got tired of having to buy expensive bolts every time I tried a different wheel configuration. They are infinitely adjustable. There is no need to worry about the threads being damaged by the large surface area of the bearing races. I too have several thousand miles on this setup and I've never had even a scuff on the threads. Another thing about using stub axles, is it gives the ability to lock the axle into the buggy with the jam nut and then the outside locknut allows perfect tightness on the wheel bearings without worrying about anything coming loose. You might have to struggle to get bolts with the right shoulder length for your wheels if you are locked into that path.

WELDNGOD - 16-6-2016 at 01:13 PM

There is always 20mm round bar ,then weld a short 3/8 bolt on the end and use a locknut and washer to keep the wheel on. That is my current setup . Works great! Not cheap though.... http://www.onlinemetals.com/merchant.cfm?pid=22286&step=...

WELDNGOD - 16-6-2016 at 01:15 PM

here it is in 304 ,a lil cheaper http://www.onlinemetals.com/merchant.cfm?pid=22254&step=...

John Holgate - 16-6-2016 at 03:14 PM


Quote:

The decision to make sub shafts like that is probably because it was a cheap solution.


No, it was the convenience of being able to use different width hubs and the convenience of using one nut to take tires on and off. The original Vmax used the SS 20mm bolts with a lock nut on the inside - this required two spanners to be used at the same time to get the correct tension - which was always a bit hit and miss. I have seen single bolt setups come loose and the wheel literally fell off. There's always more than one way to skin the proverbial cat.

BeamerBob - 16-6-2016 at 04:43 PM

Yep. Not for cheap, but for security, convenience, and adaptability.

OffAxis - 23-6-2016 at 06:26 PM


Quote:

There is always 20mm round bar ,then weld a short 3/8 bolt on the end and use a locknut and washer to keep the wheel on. That is my current setup . Works great! Not cheap though.... http://www.onlinemetals.com/merchant.cfm?pid=22286&step=...


How do you set your end play on the bearings with this method? Or do you just get it close and let the bearings walk. I guess you could stack shims/spacers/washers and get it to tighten down to lock the inner races in place.

With a bolt method and proper spacers between the bearings, you can tighten down on the inner races and lock them into position. But then a Left Hand threaded bolt should be considered for the rear right wheel.

Thoughts?

I have a feeling Flexifoil and PeterLynn concluded that using a bolt bearing spacer was the most economical choice while maintaining effectiveness. I'm also going to assume during their testing, they have determined that a left hand threaded bolt is not required and using thread tape or lock tight is sufficient to prevent the bolt coming loose.

hiaguy - 23-6-2016 at 07:00 PM

Quote: Originally posted by OffAxis  

I have a feeling Flexifoil and PeterLynn concluded that using a bolt bearing spacer was the most economical choice while maintaining effectiveness. I'm also going to assume during their testing, they have determined that a left hand threaded bolt is not required and using thread tape or lock tight is sufficient to prevent the bolt coming loose.

It's been interesting watching this thread progress.
I am about the least technical person on this board. I want to get in a basic buggy, and get down the beach, and back, with as little risk as possible.
I have a stock PL XR+ and have never had an issue with the axel bolts (20mm) coming loose - no tape or loctite. Like you, I can only imagine that if they're selling it that way, it's probably for a good reason (even if it is just plain old economics).
Now, I have had an issue with the stainless bolts on the side rails seizing, but then I learned about anti-seize, and life was good again.
I look forward to seeing your buggy - custom, stock, or otherwise - at WBB.

OffAxis - 23-6-2016 at 08:05 PM

I appreciate the kind words of encouragement. I hope that anyone who reads this thread can learn something or add their technical knowledge tips.

I'm looking forward to WBB this fall. Maybe if I get this build pulled together I'll have version 1 their and maiden it.

WELDNGOD - 24-6-2016 at 06:23 AM

Quote: Originally posted by OffAxis  

Quote:

There is always 20mm round bar ,then weld a short 3/8 bolt on the end and use a locknut and washer to keep the wheel on. That is my current setup . Works great! Not cheap though.... http://www.onlinemetals.com/merchant.cfm?pid=22286&step=...


How do you set your end play on the bearings with this method? Or do you just get it close and let the bearings walk. I guess you could stack shims/spacers/washers and get it to tighten down to lock the inner races in place.

With a bolt method and proper spacers between the bearings, you can tighten down on the inner races and lock them into position. But then a Left Hand threaded bolt should be considered for the rear right wheel.

Thoughts?

I have a feeling Flexifoil and PeterLynn concluded that using a bolt bearing spacer was the most economical choice while maintaining effectiveness. I'm also going to assume during their testing, they have determined that a left hand threaded bolt is not required and using thread tape or lock tight is sufficient to prevent the bolt coming loose.
You just cut it to size and use a washer with a nylock nut, right hand on both is fine. In 10 yrs. I have only lost one wheel. A steel one like in your pic.... Weld cracked on the hub and the whole wheel came off.Luckily it was the upwind rear so nothing bad happened.

BeamerBob - 24-6-2016 at 08:14 AM

Yes the stub axle is much easier to get the correct pressure on the bearings because the jam nut already has the axle locked in place. Just tighten the nylok to the tightness you want. Never had one come loose.

volock - 24-6-2016 at 10:40 PM

In terms of wheels, I picked up fairly cheap from CL a set of motorcycle wheels (two actually). Total paid for both (one set of two front GSXR wheels with tires, one set of two rear and one front steel spoked wheels) was around $120. Another $20 was spend on bearings/pipe to cut spacers for all the wheels. Ironically the Spoked wheels came with 15mm bearings, but I needed 20mm (and they were old/rusted/groady), one GSXR wheel came in 21mm and one in 23mm.

Fairly cheap overall for wheels that'll last me, and look good. The spoked ones still look a little rough, I'm slowly getting the steel wool to them to get them looking shiny again. The others are gorgeous in my eyes. Nice and tall (and narrow enough) for back wheels for the grass fields with too many divots/empty dirt lots so I don't bottom out like I occasionally did on my stock wheels. Weight is a bit higher than some would want, but I'm not trying to freestyle with them anyway and don't have a very light buggy.

OffAxis - 28-6-2016 at 05:37 AM

What do must guys use for tires at Wildwood Beach Buggy? Barrow or Midi Tires?

What is preferred for riding in grass fields?

abkayak - 28-6-2016 at 06:14 AM

WW you will see every type tire being run... i wouldnt even say one over any other
the big bugs got big tires but plenty of barrows too

hiaguy - 28-6-2016 at 11:04 AM

I ran barrows for couple of years, but the move to midis makes it a little easier when I get into the loose stuff at the top of the beach.

OffAxis - 29-6-2016 at 05:10 AM

Anyone familiar with buggy seat options. What are the options before I sign my mother up to making one for me(She has an upholstery sewing machine and loves to sew)?

OffAxis - 29-6-2016 at 07:14 AM

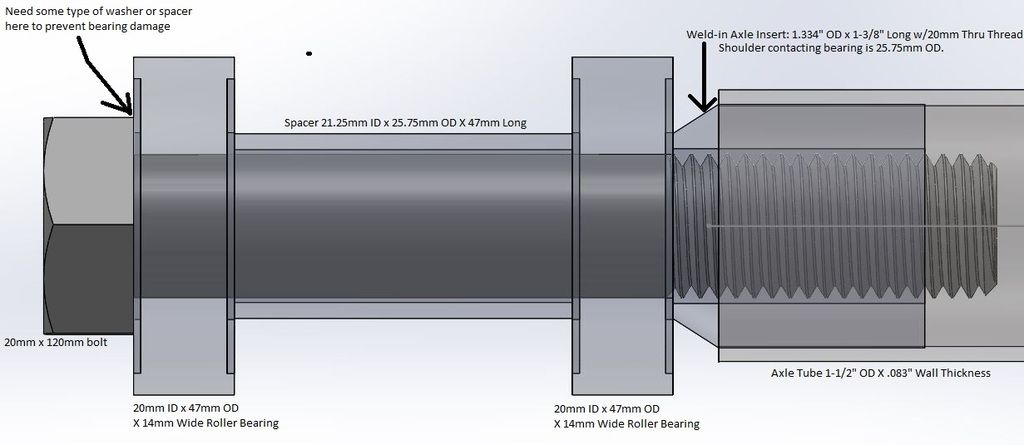
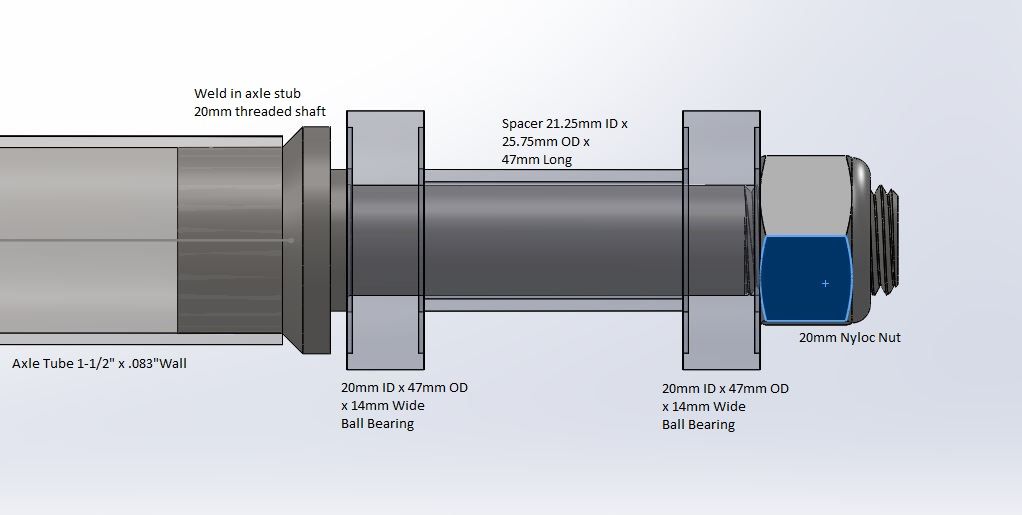
Can anyone confirm that the spacer length is correct. I do not have a PL Rim to measure the distance between the inside of the bearings.

Both options, I think need some type of spacer or washer between the bolt or nut to not pinch the bearing seal. But it looks like the PL and Flexi buggies don't have anything.

Option 1:


Option 2:

BeamerBob - 29-6-2016 at 09:23 AM

I don't think a washer is needed there.

If you weld the stub axle in, replacement will be difficult and could ruin a buggy outing or trip if the stub axle got bent.

If you use the bolt method, it would be better to also use a jam nut between the wheel and main axle.

OffAxis - 29-6-2016 at 10:21 AM

How often do 20mm bolts get bent? 20mm is a pretty hefty shaft to be bending especially at such a short distance. I would think that there is a higher change of bending the axle tube where the seat rails connect.

Theoretically, according to the manufacture and my engineering training, the bearing requires some type of shim with a maximum diameter of 26mm to prevent anything from clamping down on the seal. This applies to either case, bolt or stub shaft scenario illustrated above. I understand that you can get away with out it but technically it's not the correct usage. Can anyone confirm that PL or Flexi does not use a shim?

I disagree with the jam nut being required in the illustration of the bolt example above. When the bolt is tightened it clamps the inner races, spacer and axle insert together. If the spacer is the correct length, there will be no preload on the bearings allowing them to rotate freely. This only works if the spacer is the correct length. The Bolt would be torqued to a proper torques spec provides enough elastic elongation of the bolt to prevent it from coming loose. If the spacer is to short, the inner races will be squeezed together and pinch the ball bearings.

If I was to nitpick anything about the current PL and Flexi buggies, it would be the use of radial ball bearings. Due to all of the axial loading that the kite puts on the bearings, the correct bearing to use would be an angular contact roller bearing, taper roller bearing, etc.


If I had these parts in my hand and could look at them to see if they will work, I would be able to answer some of these questions. But since I haven't purchased anything yet, I have to go fishing is the sea of experience that the PKF contains.

WELDNGOD - 29-6-2016 at 10:51 AM

;) You are waaaayyyyy overthinking this. Sideloading isn't an issue.If you get pulled sideways too hard , you just sideslip a bit. And in10 yrs.,I haven't heard of a bearing causing a wheel to come off.

ssayre - 29-6-2016 at 11:22 AM

"Theoretically, according to the manufacture and my engineering training"

If I could choose between a team of metallurgists / engineers or a team of an experienced welders and buggy riders to build my buggy. I would choose the welders / buggy riders every time. They simply KNOW what works and what doesn't.

BeamerBob - 29-6-2016 at 11:29 AM

You might back off from disagreeing so much with others that have years and thousands of miles of experience. Your arguments don't even address the purpose or benefit of the jam nut. The only time I've had a wheel come loose is with a bolt without a jam nut. The purpose of the jam nut is to let you separate the torque of the bolt to the buggy, from the torque placed on the bearing races.

If you bend a 20mm bolt, it will likely happen when loading/unloading a buggy without the wheel mounted, during transport, or if you hit an immovable object with some force. However likely or unlikely it is, I'd rather be able to fix it with a wrench and a borrowed axle bolt than needing a shop to fix a bent bolt or damaged thread.

OffAxis - 29-6-2016 at 12:53 PM

Can anyone confirm that PL or Flexi does not use a shim between the bolt head and the bearing on the rear axle?[b/]

Quote:
If I could choose between a team of metallurgists / engineers or a team of an experienced welders and buggy riders to build my buggy. I would choose the welders / buggy riders every time. They simply KNOW what works and what doesn't.
Agreed.

I get it, I'm a noob when it comes to kiting, buggying, etc. I'm not looking to choose sides, claim to be a buggy building god, or ignite forum fires. By utilizing my training as an engineer and the KNOWledge all of you (the buggy experts) have, I'm trying to flush out the reason why people/companies selected a certain method vs. another. Example being: What are the advantages/disadvantages of not putting the clamp load through the inner races of the bearing?[b/]


hiaguy - 29-6-2016 at 12:57 PM

Quote: Originally posted by OffAxis  
Can anyone confirm that PL or Flexi does not use a shim between the bolt head and the bearing on the rear axle?

Yes.
Outside to inside: bolt head, bearing, spacer, bearing, axel. (If you make it to the other end of the axel, reverse the order:lol: ) No other metal, just the wheel and tire (and a little anti-seize on the 20mm bolt).
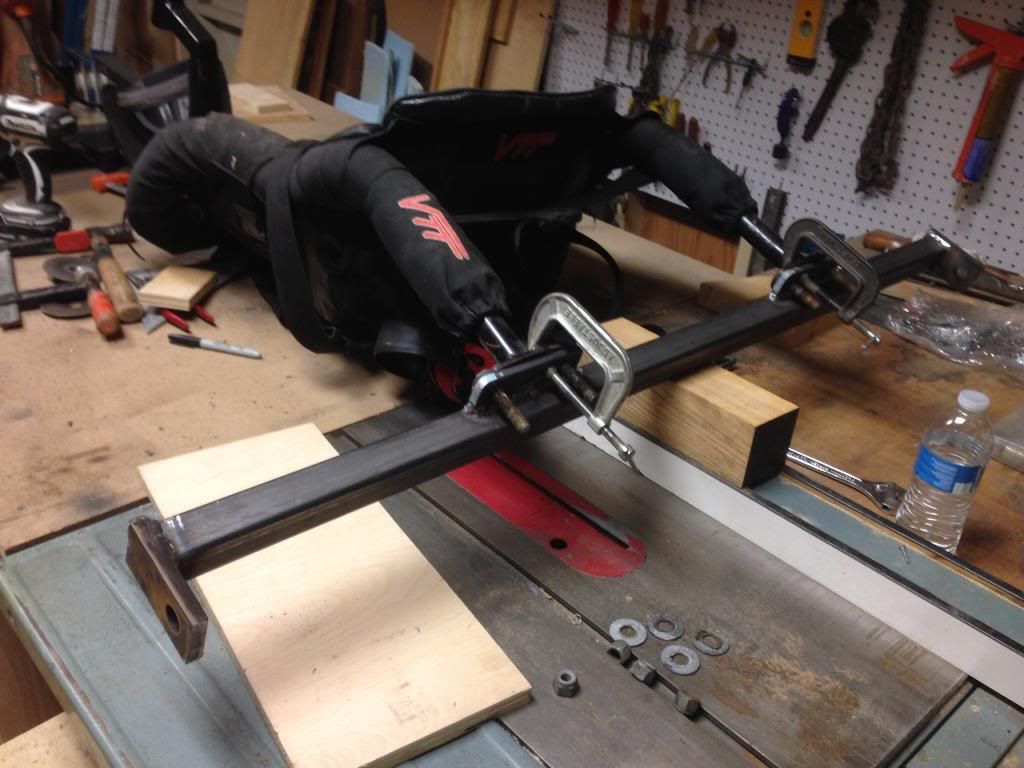
OffAxis - 29-6-2016 at 01:00 PM

Quote:
Yes.
Outside to inside: bolt head, bearing, spacer, bearing, axel. (If you make it to the other end of the axel, reverse the order:lol: ) No other metal, just the wheel and tire (and a little anti-seize on the 20mm bolt).
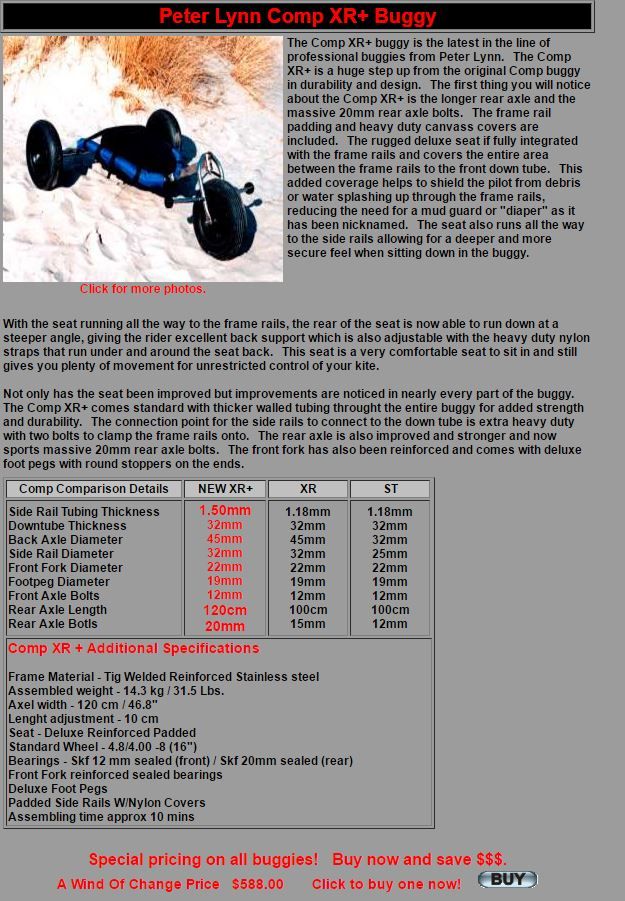

Perfect, Thanks.

bigkid - 29-6-2016 at 01:04 PM

How bout you put your years of experience to use and build a buggy. After you figure out FROM USE your next question, you won't be asking why a mouse trap works.
WHY ARE THE PL AND FLEXI BUGGY's MADE THE WAY THEY ARE? Really? It's all about making money.
How do you make a bit of money with a kite company? Start with a LOT of money.

OffAxis - 29-6-2016 at 01:16 PM

Quote:
How bout you put your years of experience to use and build a buggy.

Working on it.

bigkid - 29-6-2016 at 02:16 PM

Not trying to be an a$$, as we have Heard all of this stuff before. If anything else we've all thought it, and done it. Not to say that you're any better or dumber than we are as everyone is an expert in their own field, but it isn't until you've actually sat in a buggy that you built or someone else built, and traveled A crossed a surface of some type while powered by a kite that anything begins to make sense and you have some good questions.
Every buggy company in the world has built more than a dozen buggies before they came to some type of idea of how, what, why, that this one will be the production model.
If you want to improve on another design, then you have to understand why that design doesn't work that you're going to improve on. Or not improve on. Just saying sometimes we over Think things. As to the reference of the mouse trap, if it works why change it? But if you haven't tried it then?
We've all seen and read about carbon fiber buggies built by boat individuals, aircraft designers, and those who are exceptionally smart engineers. Sad to say they've all come and gone with nothing to show for themselves.

I did a comparison a few years back on tires and wheels on two different buggies. At the time the two buggies were top-of-the-line. Sad to say they both did exactly what they were designed to do, they only difference between the two were cost and wheels/tires. It wasn't the buggies that were better or worse, it was the tires and wheels that made the difference. I received is so much flack from one of the buggy manufacturers that they more or less Quit making that particular buggy.
Not sure as to how many buggies have been built by the average person, but I will step out on a limb and say that it wasn't there last buggy and that another one is in the works.

Go ahead and build your buggy. Then tell us all about it. We all want to hear your story of your success and failure. Until then you're going to get 1 million reasons why and just as many reasons why not to do this or do that. For me it was easier to improve on another design and rebuild one that I bought than just start from scratch and reinvent the mouse trap. Just my opinion.
So when are you going to start your buggy?

soliver - 29-6-2016 at 08:55 PM

The Master's Degree in Counseling I just earned tells me that you are more interested in us confirming what you already think is right (in spite of it being excessive and/or not so right) because like many young people, you appear to be convinced that your education supersedes the experience of the great many people from who you are seeking advice.

My experience in rebuilding and modifying my own buggy tells me that you are really making this much much much too complicated in almost all aspects. Listen, I'm (like BigKid) not trying to be a jerk, but you would do much better to actually listen to the advice (which you posted here seeking!) than to be convinced of your right-ness... its called humble pie,... eat some.

I WILL agree with you on the point of axle bolt size being changeable with the ID of the inner race of the bearing. I use bearings with an OD that fits the standard PL hub (which I use) and a 3/4" ID and a 3/4" Grade 8 bolt. My wheels bolt through a 1/2" thick plate on either end of the axle and are held in place with a spacer between the wheel and the plate all held on with Nyloc's... VTT style, ...IMHO, it is the absolute most simple solution to the bolting the wheels on question:


Chook - 30-6-2016 at 05:27 AM

More info here about bearing spacers.

http://www.extremekites.com.au/topic/12001-buggy-transport/?...

Jam nuts are just a solution to poor spacer manufacture. :barf:

Yep just build one and try it as there is no perfect solution to suit everyone's needs.

abkayak - 30-6-2016 at 05:50 AM

soliver, that looks way faster than a 28.5mph bug...even on the bench

Bladerunner - 30-6-2016 at 10:59 AM

I wonder if you have had the talk with Van that I advised ? He is somebody who came in with similar ideas to you but with tools, experience and a budget. If he had the educational background he didn't brag on it like it was important! ( but I suspect he does? ) I really think He can give you a balanced perspective and probably answer some of your questions. If you are setting out to fish in the ocean it's always good to talk to + LISTEN TO the seasoned fishermen.

Van did this the right way! He built some proto types and then took them to NABX. He encouraged everybody to pick them apart and humbly took their advice. Sort of your goal with WBB. He did a bang up job of building solutions for manufactured buggies drawbacks. For reasons I can't explain the adventure has soured for Him. Knowing the reasons he withdrew going in seems real valuable to me. But I am just a simple tradesman.

I suggest that you start on something if you want to have it set to be inspected this fall!

P.S. How does your engineering experience lead you to want to copy a PL comp? Possibly the most uncomfortable buggy made. Until Van and AWOC made after market stuff for them!

OffAxis - 30-6-2016 at 12:13 PM


Information for future reference.

awindofchange - 30-6-2016 at 12:47 PM

The purpose of the jam nut is to keep the bolt from coming loose from the Axle. You can NOT properly load the torque on the bearings AND load the proper torque on the axle with one bolt being torqued. The other problem is that when your bearing starts to get a little abused (dirty, heated up) it will begin to drag. No problem on the right side, but the left side will unscrew unless you use a reverse thread on it, which will be very difficult to find replacements for. The jam nut fixes all of these issues.


And NO, peter lynn does not use any spacers on the outside of their wheels/bearings, just one internal spacer between the two bearings. One bolt goes through everything into the axle.

OffAxis - 30-6-2016 at 12:49 PM


Information for future reference.

soliver - 30-6-2016 at 02:02 PM

Quote: Originally posted by abkayak  
soliver, that looks way faster than a 28.5mph bug...even on the bench


:lol:... Thanks! it sure feels faster!!! and it sure does hold me in when my "Glorified beds sheets" get a little twitchy. I've redone so much of it that that I'm probably responsible for 80% of it myself... following Van's model of course!

RonH - 30-6-2016 at 08:58 PM

Quote: Originally posted by OffAxis  
Well this wasn't quite to feedback I was expecting. Regardless, I'm still interested in features or designs of buggies that you guys like. Also it was mentioned that weight distribution, rake and trail are important. Any input on those parameters?


Hey...

I am way late into this but...

As someone who has made their own buggy I will add what I learned.

PL and flexi geometry is good for one specific adjustment. As soon as you adjust the down tube length the geometry changes. That is why many others don't clamp the down tube as much of an angle at all.

Their seats are not deep enough for good bracing for the side pull.

Don't worry about wheels so much. There have been good ideas on attaching different wheels. Bottom line is if the spacer in the hub is good, nothing else really matters. I prefer my wheels to be tight! The proper sized spacer in the hub means you can torque up the bolts and you are not side loading the bearings. If you look at the shoulder on the nuts and bolts, you will see why a spacer is not needed. Nice bit of built in space like they were made just for us so bearings can run free!

Rake and trail will depend on the kind of buggy you are trying to build... Small sporty unit or an all out race machine will be different.

Look at what has been used previously and start there. Make changes and then... make more changes till you are happy.

Ron

soliver - 30-6-2016 at 09:50 PM

Well said Ron

OffAxis - 6-7-2016 at 12:58 PM

I'm slowly constructing the 3d model. Mocked up the front fork finally. I've also been digging around the internet for a supplier that can bend and flatten tube just to see what their price would come in at.


John Holgate - 6-7-2016 at 03:19 PM

Before you lock yourself into a front fork, you could source your wheels first then make the fork to fit. ie: a set of wheels with midi tyres might pop up at a good price, or you find similar at a market and they may not fit a std barrow type fork. I keep the bigfoot fork on my Vmax whether I run midi's/bigfoots or 17" rims - it doesn't matter if it's larger than the midi's but it obviously doesn't work the other way round.

And keep in mind a decent mudguard - home made or bought from an atv/bike shop, it would be good to have the attachment points ready to go on the fork rather than try to add something afterwards.

OffAxis - 7-7-2016 at 05:02 AM

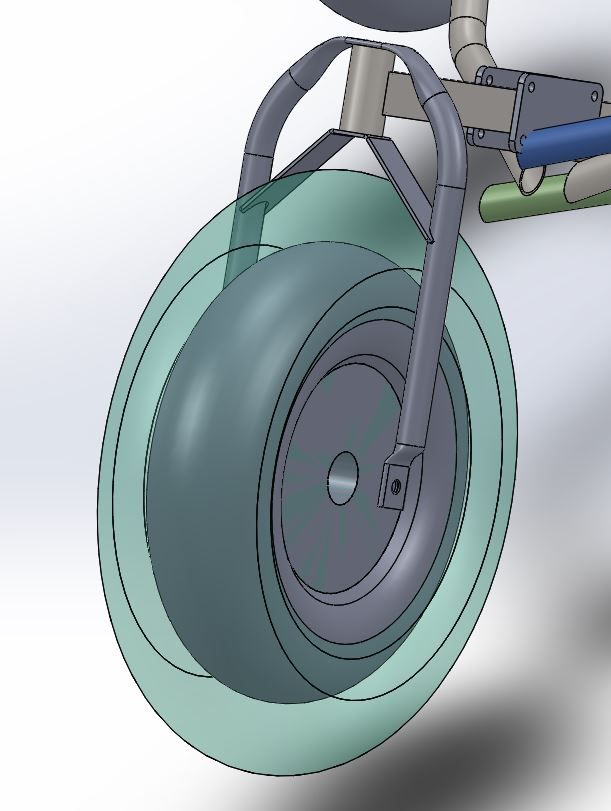
I adjusted the front fork to fit these tire sizes.

Tire Sizes:
Standard Ribbed and Smoothie tires: 4" wide x 16" tall x 8" wheel.
Wide Tires: 6" wide x 16" tall x 8" wheel.
Big Foot Tires: 6" wide x 21" tall x 8" wheel.

The clear green wheel is the big foot tires. The gray wheel is a midi wheel.


abkayak - 7-7-2016 at 08:13 AM

you need to go buggy and stay off the computer a bit......jusayin

igeighty - 7-7-2016 at 08:00 PM

It would be best to get hold of some wheels with tyres to see the different sizes,
The midi is considerably larger than the barrow wheel. and the bigfoot is very much larger than the midi.

Here is a photo of my midi next to a bigfoot, i will be able to measure them properly if you wish.

IMG_0831.jpg - 159kB

From the looks of your buggy, it seems you are copying a peter lynn buggy. i own one, and i find the seats are not supportive enough, and way to shallow, There is no back support in them.
and your legs are typically up around your ears in them.

Have you had much experience riding in a buggy for long periods of time ?

In the PL (and flexi) low rails make it difficult to hold power down against those low rails. This kind of buggy is fine for cruising and fields. but for long rides it can become quite uncomfortable.

Higher (longer) side rails for a deeper seat, swan neck vs downtube for better rider position, and definitely some kind of backrest.

The european buggies are built much longer and the rider sits lower to the ground with side rails up under the armpits further,
this allows you to hold more power and a more secure ride.

sorry i can't explain it better, i am just not got at 'words'

Peter lynn, good for a giggle in the park, but lower, longer, wider for the reel cruiser feeling. a buggy you are sitting 'in' rather than 'on'

i figure if you are going to go to all the trouble of making your own, make it a good one :) and not just another PL/flexi clone

good luck with your build :)


Windstruck - 8-7-2016 at 03:21 AM

Quote: Originally posted by igeighty  
It would be best to get hold of some wheels with tyres to see the different sizes,
The midi is considerably larger than the barrow wheel. and the bigfoot is very much larger than the midi.

Here is a photo of my midi next to a bigfoot, i will be able to measure them properly if you wish.


From the looks of your buggy, it seems you are copying a peter lynn buggy. i own one, and i find the seats are not supportive enough, and way to shallow, There is no back support in them.
and your legs are typically up around your ears in them.

Have you had much experience riding in a buggy for long periods of time ?

In the PL (and flexi) low rails make it difficult to hold power down against those low rails. This kind of buggy is fine for cruising and fields. but for long rides it can become quite uncomfortable.

Higher (longer) side rails for a deeper seat, swan neck vs downtube for better rider position, and definitely some kind of backrest.

The european buggies are built much longer and the rider sits lower to the ground with side rails up under the armpits further,
this allows you to hold more power and a more secure ride.

sorry i can't explain it better, i am just not got at 'words'

Peter lynn, good for a giggle in the park, but lower, longer, wider for the reel cruiser feeling. a buggy you are sitting 'in' rather than 'on'

i figure if you are going to go to all the trouble of making your own, make it a good one :) and not just another PL/flexi clone

good luck with your build :)


i80 nailed it. Many of us own PL buggies and pretty much wish we didn't. I've gotten part way towards what i80 is very correctly referring to with a VTT rail and seat upgrade kit for my otherwise stock PL Bigfoot+. Well not quite stock as I did upgrade to Sysmic rims and new tires that I bought from the venerable Utahtami (speed demon extraordinaire), but the wheels were a pure pimp-my-ride upgrade and had nothing to do with form or function. I've thought long and hard about upgrading to a swan neck front end and may pull that trigger someday for the functional reasons noted by i80.

Memory serves that early on in this thread it was suggested that you contact Van for insight as he went through an evolution of sorts along exactly these lines. Having gotten to know him a bit over the past year I too can join the long and distinguished list of folks that are very glad they know Van. Dude knows his stuff and you would be well served to reach out to him in the event you haven't already done so. At the very least, consider working towards designs more akin to his buggies than standard PL or Flexi styles.

Please trust what you are hearing; the sitting "in" versus "on" stuff is real. The side pull you experience for long periods of time such as during beach runs or long shots on dry lake beds really put a strain on your body after a while. Why go to all the trouble of a build and then a long ride only to be unnecessarily uncomfortable?

I've enjoyed this thread from afar. I hope your build goes well. This does look like a fun project! Good luck.

OffAxis - 8-7-2016 at 04:44 AM

igeighty: those tires are rediciclous. What size is that?

This process is definitely an evolutionary process. Thanks everyone for providing feedback about various buggy feature pros and cons, keep the ideas coming. I do need to mock up the more finalized design to verify seat shape, comfort and ergonomics. The next few weeks are crazy for me so i suspect progress to be slow. So stay tuned. I want to make sure the design is "finished" before I fabricate version 1.


Digging around the interwebs I was able to find some further information about buggy backrest mods:
http://www.powerkiteforum.com/viewthread.php?tid=8822
http://www.powerkiteforum.com/viewthread.php?tid=8698

OffAxis - 8-7-2016 at 05:32 AM

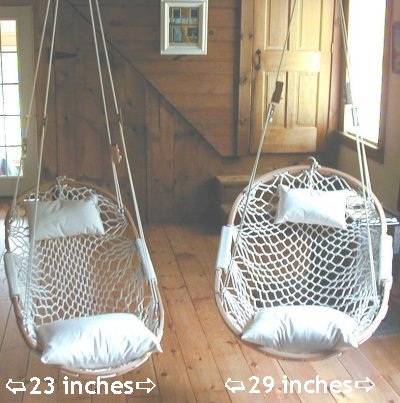
Has any every tried making a hammock style seat? Thoughts?


abkayak - 8-7-2016 at 05:53 AM

you get dirty, wet, whatever covered in enough when riding as it is...i wouldnt go w/ any open weave
although the 1st bugs kinda did...but in essence all my seats are slung hammock like, just solid fabric
would like one of those for my front porch

igeighty - 8-7-2016 at 06:48 AM

Hi Offaxis

The large wheel is a Kenda beach racer 21x12-8 on a Sysmic 8x4 inch alloy rim.
The wheel next to it is a Kenda Midi Tire 16x6.5-8 on a Peter Lynn 8x2.5 inch rim.

I started life in 1995 on a Peter Lynn Mk1. It was a tiny thing with a webbing seat, i would always get mushed up bluebottles spraying of the front wheel on my balls with the webbing seat. It was a great little buggy. but at the time there were not any other designs out there.

After a break i returned to kiting and bought a Peter Lynn Comp XR+ (pictured below) just because it was what i knew. but being nearly 20 years older i found it had no back support and i always felt like a hunchback riding it. although an improvement over the mk1, it still felt like i was sitting 'on' it rather than in it with my knees around my ears.

I then bought a GT race buggy after sitting in some of the other guys bigger buggies that where so much more comfortable. There are a few peter lynn's down under. However most guys have bigger buggies.

Peter Lynn comp xr+ with larger front fork. and midi wheels
IMG_8308.jpg - 173kB

Front to back,, my GT-Rapide++ (beach racers) Roblukins GT-Radical (midi wheels), john holgate's libra vmax (beach racers)
IMG_8543.jpg - 237kB

GT-Race rapid ++ with beach racers
IMG_8550.jpg - 209kB

Notice the low sitting position with straighter legs ?
IMG_0600.jpg - 190kB

Johns Vmax,it has a very low body centre, much more comfortable for long rides. He uses beach racers and midi's depending on the surface. Robs radical is essentially a smaller GT-Rapide, same thing, low body centre, very stable, very comfy. He is usually first on the beach and last off. (most of the time the quickest)

There are many many different designs out there. But i my opinion (others may not agree) i feel you dont need to 'race' in a race buggy, but they make VERY good cruisers with a deep seat, good back support and longer distance to the pegs via the swan neck. the tradeoff is that they are inherently larger. I used to get very exhausted in the peter lynn, but in the GT i can ride it all day and still much it up the sand dunes at the end of the day.

Sysmic made a great buggy that was not as large as a racer, the S1. it maintained the low centre of gravity and length, while still keeping it relatively small. A fellow we buggy with, Michael has one, as it is a real rocket.

4450103464_9b056925df.jpg - 72kB

I love my peter lynn, don't get me wrong. I think they are a great buggy for ratting around a park or oval and before getting my bum into Clives libra majestic, i would never have known the difference. however once i did park my ass in race buggy. i was amazed at the difference in the comfort, not to mention the control. and how much extra speed i can hold down. I'm not sure i could go back :) 60 kph in a peter lynn is a bit of a brown pants moment, but 60 in a larger race buggy just feels good.

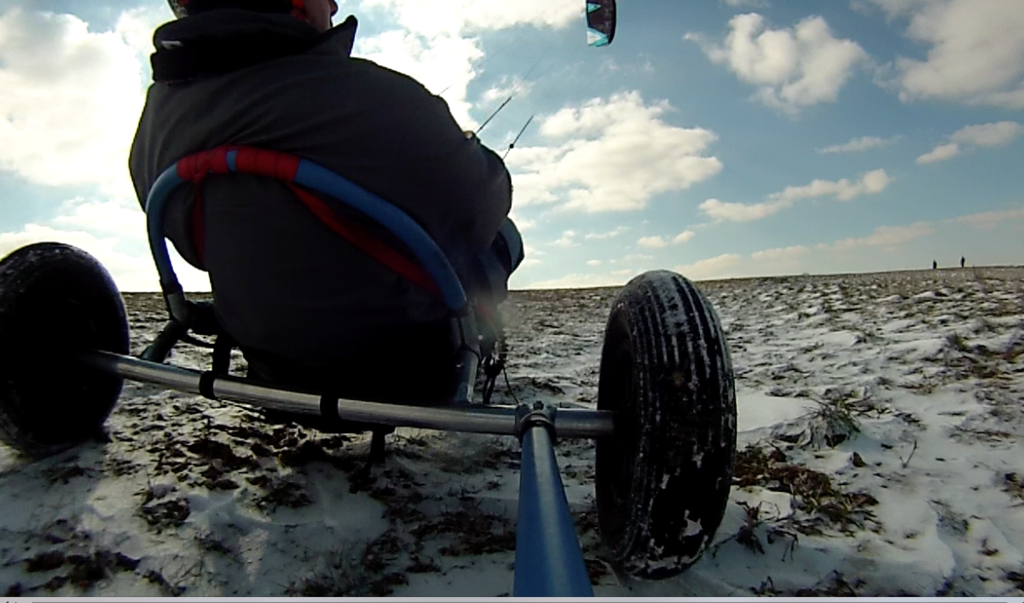
As for your hammock seat design, peter lynn and flexi used to do this method, as did land lizard and other 'vintage' bugs. Its what we had back in the day. Everyone had seats made of webbing, but they are a bit sketchy when compared to a fully protected nut sack in a nice firm cordura seat :)

Deep seating position with firm back support is fantastic. unfortunately my peter lynn even with its newer style seat just doesn't give me that support. Nearly all the guys who have one extend the side rails and make back rests. and for the cost of a peter lynn or flexi or zebra, a few extra dollars gets you a lower sleeker and more comfy ride.

Get your ass parked into as many different buggies as you can, and you will see the pro's and cons of the many different designs.

If i was welding my own, it would definitely be something more 'race'

good luck with it man. i am envious of anyone who has the smarts to build there own :)

regards.
Doug

Bladerunner - 8-7-2016 at 03:38 PM

igeighty is spot on with his input!

Webbed seats didn't last for many good reasons. Sort of like wheel barrow wheels.

As I mentioned at the top, you are trying to copy about the most uncomfortable buggy I have ever used. Getting some seat time will show you what we are all saying.

If you don't get started building soon I don't see you making your goal of having it for WBB this fall? Maybe the best thing you can do is hold off until you have been to WBB. Folks there will be happy to let you try some more beefy models. This is of course assuming you have your kite skills down? If not, You are putting the cart before the horse!

What does Van think about your ideas?

ssayre - 8-7-2016 at 05:57 PM

I have the xr and with a simple backrest its very comfortable. I'm only 5'9". I would not recommend it to anyone taller than that. I agree, in it's stock form it's barely usable, but with a couple simple mods it's very comfortable as long as your short.


van - 20-7-2016 at 09:18 PM

One of my buddies told me about this thread so I was curious and took a look. I didn't read thru all the replies but I kind have an idea what is going on. Let me summarized by thoughts on this thread in a few short and concise points.

1) It is great to want to build your own buggy if you want the experience and the bragging rights to say that you made it yourself.
2) It is cheaper to buy a starter buggy then build one. Custom buggy .. that's totally different.
3) Copying one of the worst buggy ever built ( Peter Lynn) just set you back years in buggy design. Yes, it was the best thing since sliced bread in the 90's. But it's 2016.
4) No matter how much engineering you learned in school , it will never equal experience. Engineering doesn't tell you things like needing correct back support if you don't have abs of steel.

I started building buggies years ago because I wanted to build a better mouse trap. If you've seen my older threads you will see my crazy ideas of a single sided front fork .. that' didn't work.. lol.

After 3 years of building buggies on the weekends , I stopped building buggies on a regular basis and only do it here and there on my spare time. I probably have about 30 VTT buggies out there ( Cricket, Black Widow and Stinger Race ). Why did I stop? Cost. If I wanted to maintain the quality, I have to raise the price to keep selling. I was loosing money making these buggies. I've spent over $25K in tools to build these buggies and they weren't paying for themselves. If you do it right, it will cost money. If you can build it cheap .. I guarantee you that you will spend more time on the beach fixing that buggy while others are out riding.

OffAxis, feel free to email me or give me a call if you need help with your build. Folks on this site know I am always open to any questions. I don't keep any secrets about my designs or what I learn. Always happy to share.

soliver - 20-7-2016 at 10:12 PM

listen to Van... He is the man!

I had many many email and text exchanges, even phone conversations with him over the process of my work on his buggies... He is very willing and to talk and share his experience.... A VERY valuable asset for you as you move forward!

OffAxis - 21-7-2016 at 04:52 AM

Van, thanks for the insight brother! I'm sure I get in touch with you eventually. The design is not locked into the PL buggy, it was just a frame of reference as a starting point. With all the feedback I have been receiving, I have been iterating the design. I have been super busy lately and haven't found the time to keep working on the model but there's no rush.

I just got back from what is probably the best rc flying event ever. http://flitefest.com/. It's like a huge family reunion. Lots of crazy planes were built crashed and built again. Records were broken. Also lots of fun and fellowship with friends we see once a year!


van - 21-7-2016 at 11:57 AM

Great .. that's good to hear. It is good to keep an open mind. I changed my buggy design many, many times ... I learned alot from others on this forum also. I learned from their success and I learned from their mistakes. Most of my design are not original , yes I've talked to other builders and borrowed a few ideas here and there. Why do you think all the high end buggies look the same?? We find the features that work and incorporate them and throw out the ones that don't work.

Bladerunner - 23-7-2016 at 09:18 AM

Save whatever money you have for the build and make sure you get to WBB!

There will be all sorts of buggy designs there to pull inspiration from. Like the RC group you will be among friends who want to share what they know and encourage you. Or at least send you home on a more clear path.

You have never really replied to what you have for pilot skills and kites? 90% of this game is kite control. An engineering degree ( or even pilots licence :) ) can't give you that.

Notice how even Van suggests that you are better off getting a basic starter buggy and building from there. If you listen to ANYBODY, listen to Van. He has been through exactly what you are trying to do.

abkayak - 23-7-2016 at 12:06 PM

Yea you should build after WW...come have a look/see

Design reboot....

OffAxis - 20-1-2017 at 10:52 PM

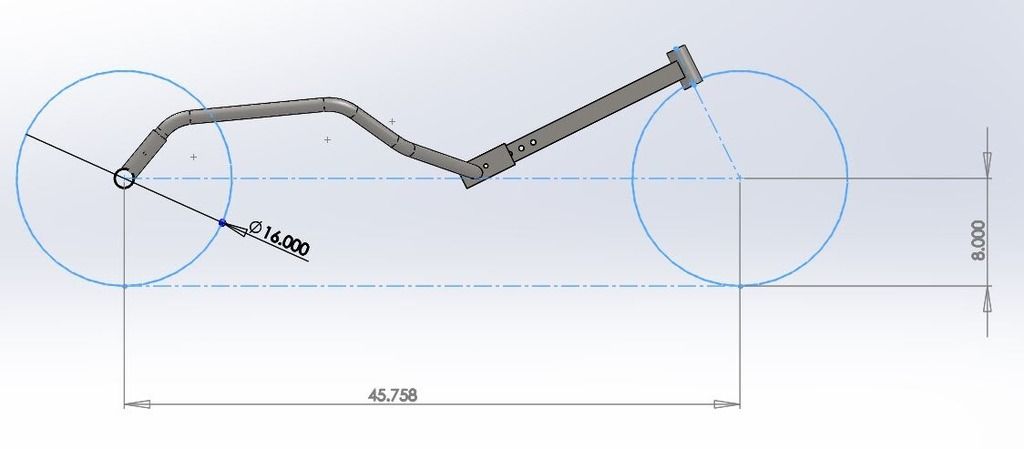
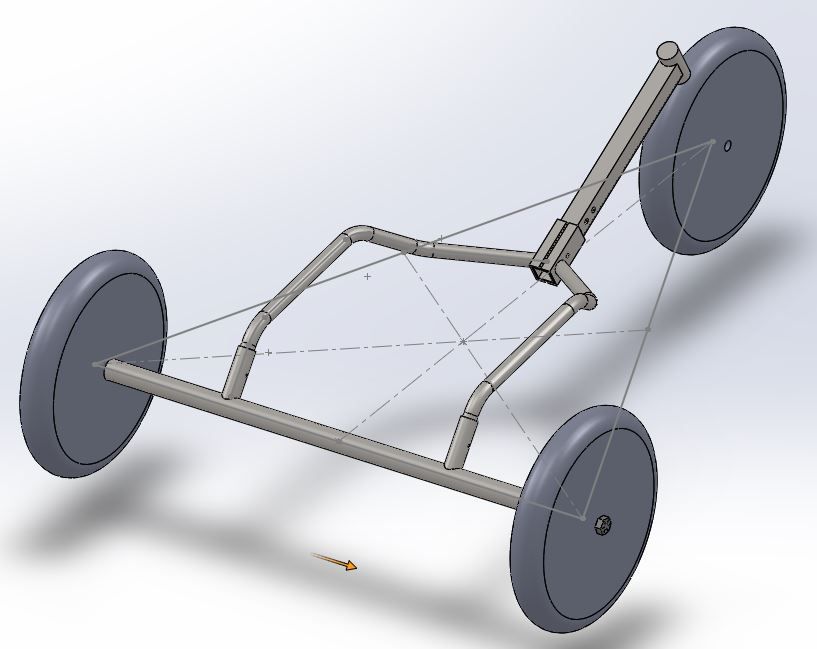
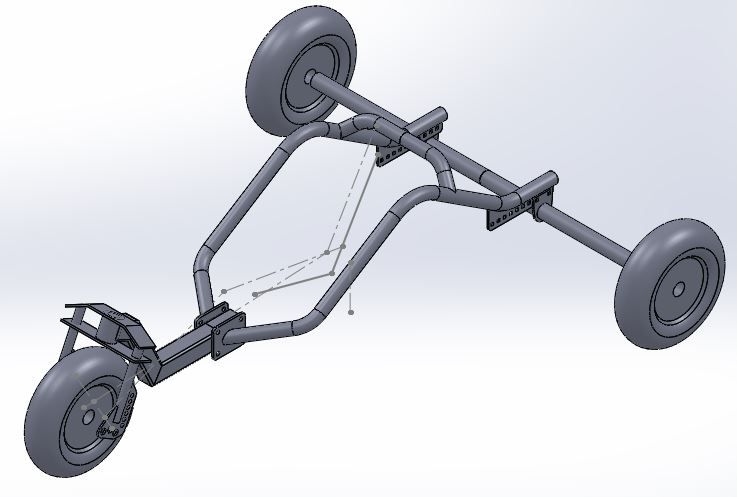
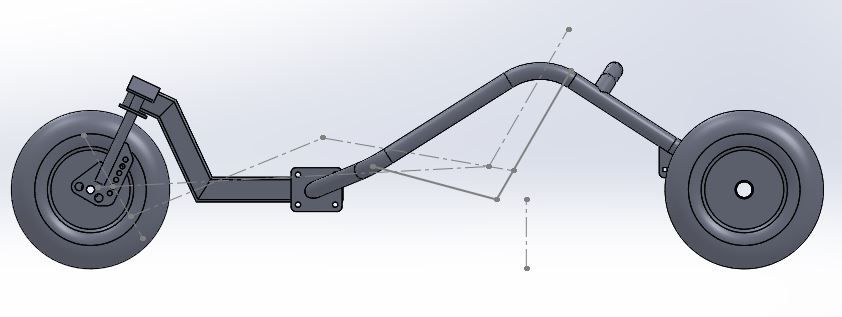
Welp, after busting out a rim on my kite trike I've decided to rework the design and get more serious about building a better buggy. The kite trike will then hitch as a tandem to this buggy when needed. Here's what I've come up with for general shape and fit. My wife laughed at me sitting on the floor measuring out what I think would be ideal buggy size for me.

Here are the specs:
Me: 5'10", 175lbs, 32in waist, ~38in chest.

Oh, you were expecting buggy specs...:

Material: Plain Carbon Steel
Tires: Midi (16/6.5-8) or Barrow wheels
Axle Dia.: 20mm all around
Length (Axle to axle): 66in. max, 51in min.
Axle Width: 57.5in.
Trail: 2in, 3.125in, or 3.9in
Head Angle: 65deg
Seat Back Angle: 60deg
Seat Base Angle: 15deg
Rear Axle Tube Dia.: 1.5in sch40 pipe
Seat Frame Tube Dia.: 1_1/4in sch40 pipe
Fork Width: 8.7in
Fork Tube size: 1in sch40 pipe
Neck Tube size: 2.5in sq. x .120in tube
Sheet metal parts: .250in or .3125in
Frame Weight: ~65lbs
Est. Total Weight: 100-110lbs

Rear axle adjustment length: 7in, 1 in increments
Neck Adjustment length: 8in
Seat position from front axle: 41in max, 33in min
Seat position from rear: 25in max, 18in min
Seat Clearance height: 7in
Seat Back height: 15in
Seat Width: 16.5in
Seat bottom length (back rest to clamp): 16in
Foot peg height: 8.9in to 11.8 from ground.

Comments: I won't always be riding on a beach, so I think a good amount of ground clearance is better. Maybe I should add some fork angle adjustment into the clamp design. I need to clean up the fork design and decide on a the fork bearing setup yet. Also need to add hitch point to the rear axle.


The lines shown in the picture represent the seat and body position at max chassis length.


Question to you all: How much adjustment is necessary to be able to dial in the buggy to achieve the proper tow point. The neck adjustment allows for setting the proper length between the seat and pegs, which also messes with your Center of gravity and tow point. To compensate for this change I've added the feature of being able to slide the axle forwards or back to help compensate for setting proper center of gravity and tow point. Is this feature necessary? I fully expect that once the buggy sets off on the maiden voyage, the neck and axle location would be adjusted as necessary then probably never adjusted again.

I have the seat 3in in front of the centroid of the triangle formed by the tires. The centroid should be close to the center of gravity of the buggy. From my reading, people recommend the back tires breaking loose first, so I bumped the seat forward a bit to keep the weight a bit forward. Let me know if this is bogus thinking and the seat should be located near the midpoint between the front and rear axle.

Let me know what you guys think.

Zipzit - 7-4-2017 at 10:46 PM

OffAxis,

Nicely done. I'm way curious, as I'm thinking of following along in your footsteps. I used to be an automotive design engineer, I'm a decent TIG welder, have tools and access to some decent tools, including high powered hydraulic tubing bender with complete set of mandrels. Unfortunately I'm a kite cart newbee, and I don't know a soul around here who has a cart that I might try. I've still got a lot of kite control (learning) work to do.

At the same time somebody offered me up a set of 3 small trailer wheels (4 stud on 4" radius), with two hubs. A hub for the front runs around $47 for sealed tapered bearing setup, from our friends in Azusa, CA.

Been looking closely at your content here. I'm really curious to know how those trail numbers work out for you.

In fact I have one tool that might be of interest to you (and anybody else here). I spent a whole lot of time looking at custom bicycle and other related frame designs. I rewrote software to do all sorts of tubing miter work. Its online and free, includes simple miters, decorative sleeving, Seat Tube to Seat Stays joint, round to tapered, oval to round, engine exhaust collectors, airframe cluster joints, etc...

Hosted on my site, all my work, feel free to use. The software generates full size paper templates. Cut on the line, wrap the tube, use a felt tip pen to mark the cut boundary, throw it into a vise and cut away. I've also included reference markings to make component lengths perfect.

Click here for the TubeNotcher software

Code is currently written in JavaScript, so it runs right in the browser, creates full size templates on paper (including large diameter tubing). Nothing to download beyond Adobe Acrobat Reader.

Possible to get a copy of your solidworks model in exchange? I suspect I will want less ground clearance than you, (I'm only on a dry lake bed, and its way flat...) and I certainly have to accommodate my oddball little trailer wheels, but a model like yours would be a place to start.. I do have some specific ideas on a different front fork design I'd like to try. If my request is out of bounds, no offense intended.

Many thanks for sharing the details you've already provided...

Zip

Windstruck - 8-4-2017 at 07:06 AM

Quote: Originally posted by Zipzit  
OffAxis,

Nicely done. I'm way curious, as I'm thinking of following along in your footsteps. I used to be an automotive design engineer, I'm a decent TIG welder, have tools and access to some decent tools, including high powered hydraulic tubing bender with complete set of mandrels. Unfortunately I'm a kite cart newbee, and I don't know a soul around here who has a cart that I might try. I've still got a lot of kite control (learning) work to do.

At the same time somebody offered me up a set of 3 small trailer wheels (4 stud on 4" radius), with two hubs. A hub for the front runs around $47 for sealed tapered bearing setup, from our friends in Azusa, CA.

Been looking closely at your content here. I'm really curious to know how those trail numbers work out for you.

In fact I have one tool that might be of interest to you (and anybody else here). I spent a whole lot of time looking at custom bicycle and other related frame designs. I rewrote software to do all sorts of tubing miter work. Its online and free, includes simple miters, decorative sleeving, Seat Tube to Seat Stays joint, round to tapered, oval to round, engine exhaust collectors, airframe cluster joints, etc...

Hosted on my site, all my work, feel free to use. The software generates full size paper templates. Cut on the line, wrap the tube, use a felt tip pen to mark the cut boundary, throw it into a vise and cut away. I've also included reference markings to make component lengths perfect.

Click here for the TubeNotcher software

Code is currently written in JavaScript, so it runs right in the browser, creates full size templates on paper (including large diameter tubing). Nothing to download beyond Adobe Acrobat Reader.

Possible to get a copy of your solidworks model in exchange? I suspect I will want less ground clearance than you, (I'm only on a dry lake bed, and its way flat...) and I certainly have to accommodate my oddball little trailer wheels, but a model like yours would be a place to start.. I do have some specific ideas on a different front fork design I'd like to try. If my request is out of bounds, no offense intended.

Many thanks for sharing the details you've already provided...

Zip


Zip,

I'm pretty familiar with that lake bed you describe. :karate:

In fact, I'm wearing an IBX2017 t-shirt right now. As you may be aware, there was the year's biggest buggy (etc.) event on Ivanpah just a few days back. Sorry we didn't see you there.

What sized guy are you? I ask only because there are several great buggy guys that live in the greater Vegas area that are sponsored riders and have some great buggies in their own rights. You might be able to hook up with them. Brian Holgate and Bobby Muse (beamerbob here).

I'm not a machinist or anything like that, but my one piece of constructive input would be to say that if you are going to go to the immense effort to custom build a buggy (a super cool project btw) then I'd want to ensure that your wheels are the type you want for Ivanpah and not simply build your buggy around the wheels you have. Maybe your wheels are just right, but if it were my project I'd want to get just the right wheels. Just sayin'.

Go for it!

Steve

WELDNGOD - 8-4-2017 at 07:12 AM

Zipzit, nice tool ! My 36 yrs of experience has shown me this one important thing . You don't need that CAD stuff,it's all fancy ,but if you can't draw it (and I don't mean on a pc),you can't build it.
Get a square , a set of dividers, a straight edge, a protractor, and level and draw it out full scale on the shop floor or fab table. All views........ Then build it .

Good luck guys, post build pics ! :)

 Pages:  1